
These are the ramblings of Matthijs Kooijman, concerning the software he hacks on, hobbies he has and occasionally his personal life.
Most content on this site is licensed under the WTFPL, version 2 (details).
Questions? Praise? Blame? Feel free to contact me.
My old blog (pre-2006) is also still available.
See also my Mastodon page.
- Raspberry pi powerdown and powerup button (45)
- Repurposing the "Ecobutton" to skip spotify songs using Linux udev/hwdb key remapping (3)
- How to resize a cached LVM volume (with less work) (2)
- Reliable long-distance Arduino communication: RS485 & MODBUS? (6)
- USB, Thunderbolt, Displayport & docks (21)
| Sun | Mon | Tue | Wed | Thu | Fri | Sat |
|---|---|---|---|---|---|---|
| 1 | 2 | 3 | 4 | |||
| 5 | 6 | 7 | 8 | 9 | 10 | 11 |
| 12 | 13 | 14 | 15 | 16 | 17 | 18 |
| 19 | 20 | 21 | 22 | 23 | 24 | 25 |
| 26 | 27 | 28 | 29 | 30 | 31 |
(...), Arduino, AVR, BaRef, Blosxom, Book, Busy, C++, Charity, Debian, Electronics, Examination, Firefox, Flash, Framework, FreeBSD, Gnome, Hardware, Inter-Actief, IRC, JTAG, LARP, Layout, Linux, Madness, Mail, Math, MS-1013, Mutt, Nerd, Notebook, Optimization, Personal, Plugins, Protocol, QEMU, Random, Rant, Repair, S270, Sailing, Samba, Sanquin, Script, Sleep, Software, SSH, Study, Supermicro, Symbols, Tika, Travel, Trivia, USB, Windows, Work, X201, Xanthe, XBee
 &
&
(With plugins: config, extensionless, hide, tagging, Markdown, macros, breadcrumbs, calendar, directorybrowse, feedback, flavourdir, include, interpolate_fancy, listplugins, menu, pagetype, preview, seemore, storynum, storytitle, writeback_recent, moreentries)
Valid XHTML 1.0 Strict & CSS
For a while, I've been annoyed by the height of my desk. It is slightly higher than ergonomical, which causes my shoulders to be always raised when I'm working behind my computer.
Since sawing off a bit from the feet of my desk was a bit too irreversible for me (and it's hard to figure out how much to cut off exactly), I looked for a way to raise my office chair a bit further than its normal adaptable range. I couldn't find a way to get the central pillar loose from the base (even though the pillar looks threaded, it wouldn't turn), so I looked for a way to extend the wheels a bit.
The wheels are fixed into the base of the chair using a pin in the wheel that clamps into a socket in the base of the chair ("klemstift").

I was hoping to find a part that has a pin at the top, and a matching socket at the bottom, which I could use to extend the length of the pins of my wheels a bit. It seems these things don't actually exist, at least I couldn't find any online.
Looking at the wheels more closely showed me that the pin wasn't actually fixed in the wheel, but it was actually a two-side pin that also clamped into the wheel.
This opened up the option of replacing the pin with one that has one threaded end, which can receive a "coupler nut" (not sure how these things are really called connecting to another identical pin, which can be inserted into the chair base again). These parts should be available from a proper hardware store for less money than the webshops I linked, by the way.

The end result is that I now have a chair that is around 5cm higher than before. It looks a bit weird and a bit fragile, but it actually feels more robust than it looks.
My legs are now pushed against the bottom of my desktop, so this is as high as it gets. For the perfect ergonomical position, I should be even higher, but that seems impossible unless I find a desk with negative thickness (I suspect this is because my arm length to torso length is a bit non-standard due to my above-avarage body length). Even so, I can already feel that this handful of centimeters greatly helps to improve my posture and removes a ton of strain from my shoulders. Yay!

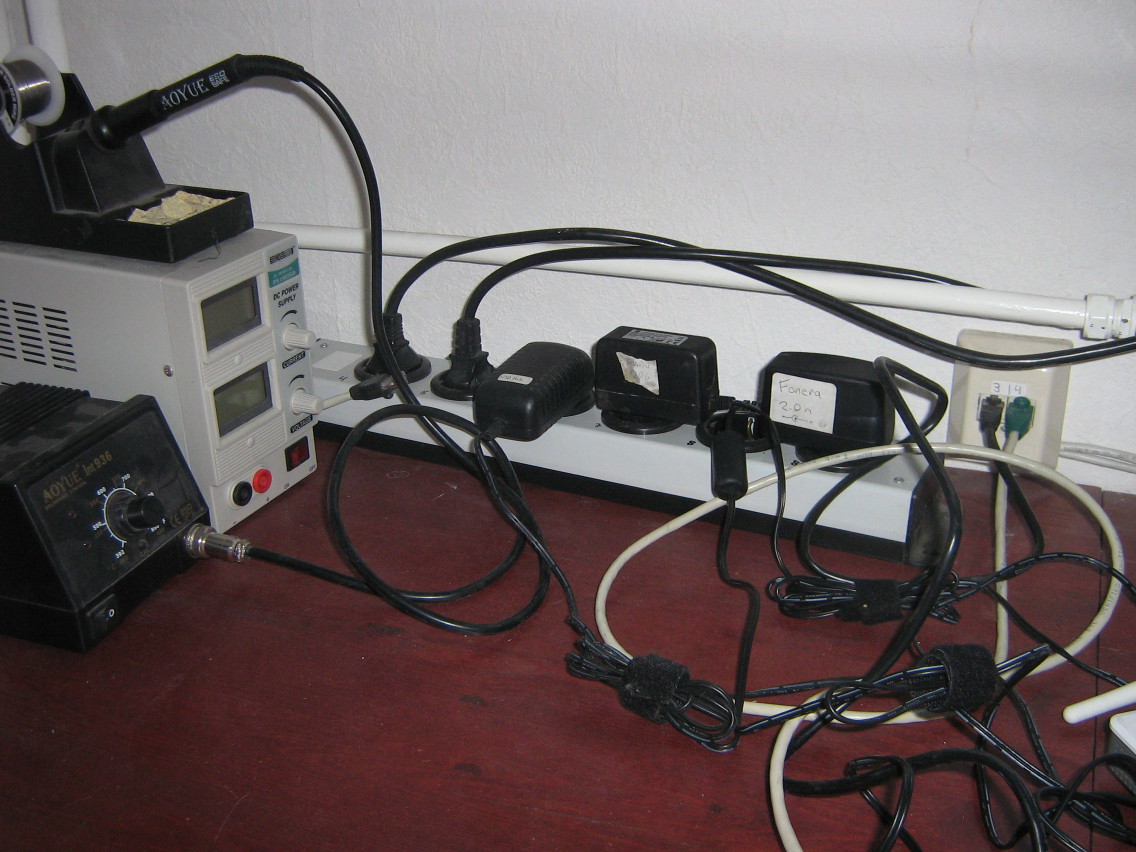
Since ages, I've been using switched power bars to connect my computer equipment. Originally, I used a normal outlet to connect my PC and a switched bar to connect my monitor, speakers, printer, etc. This allows me to actually completely switch off everything when I'm not using it, saving a couple of Watts of leakage power and removing the need to switch all of my equipment off separately.
Since then, the amount of electrical stuff on my desk has increased a bit, now also including quite some stuff unrelated to my computer. I now count: a laptop adapter, an USB hub, speakers, a printer/scanner, an external hard disk, a battery charger, a phone charger, a charger for my shaver, some soldering equipment, a pile of wireless access points (my work for Fon).
Plugging in all this stuff in a single power bar wasn't very helpful: I would have the bar turned on most of the day when working on my laptop, so all the other devices would be leaking power as well.

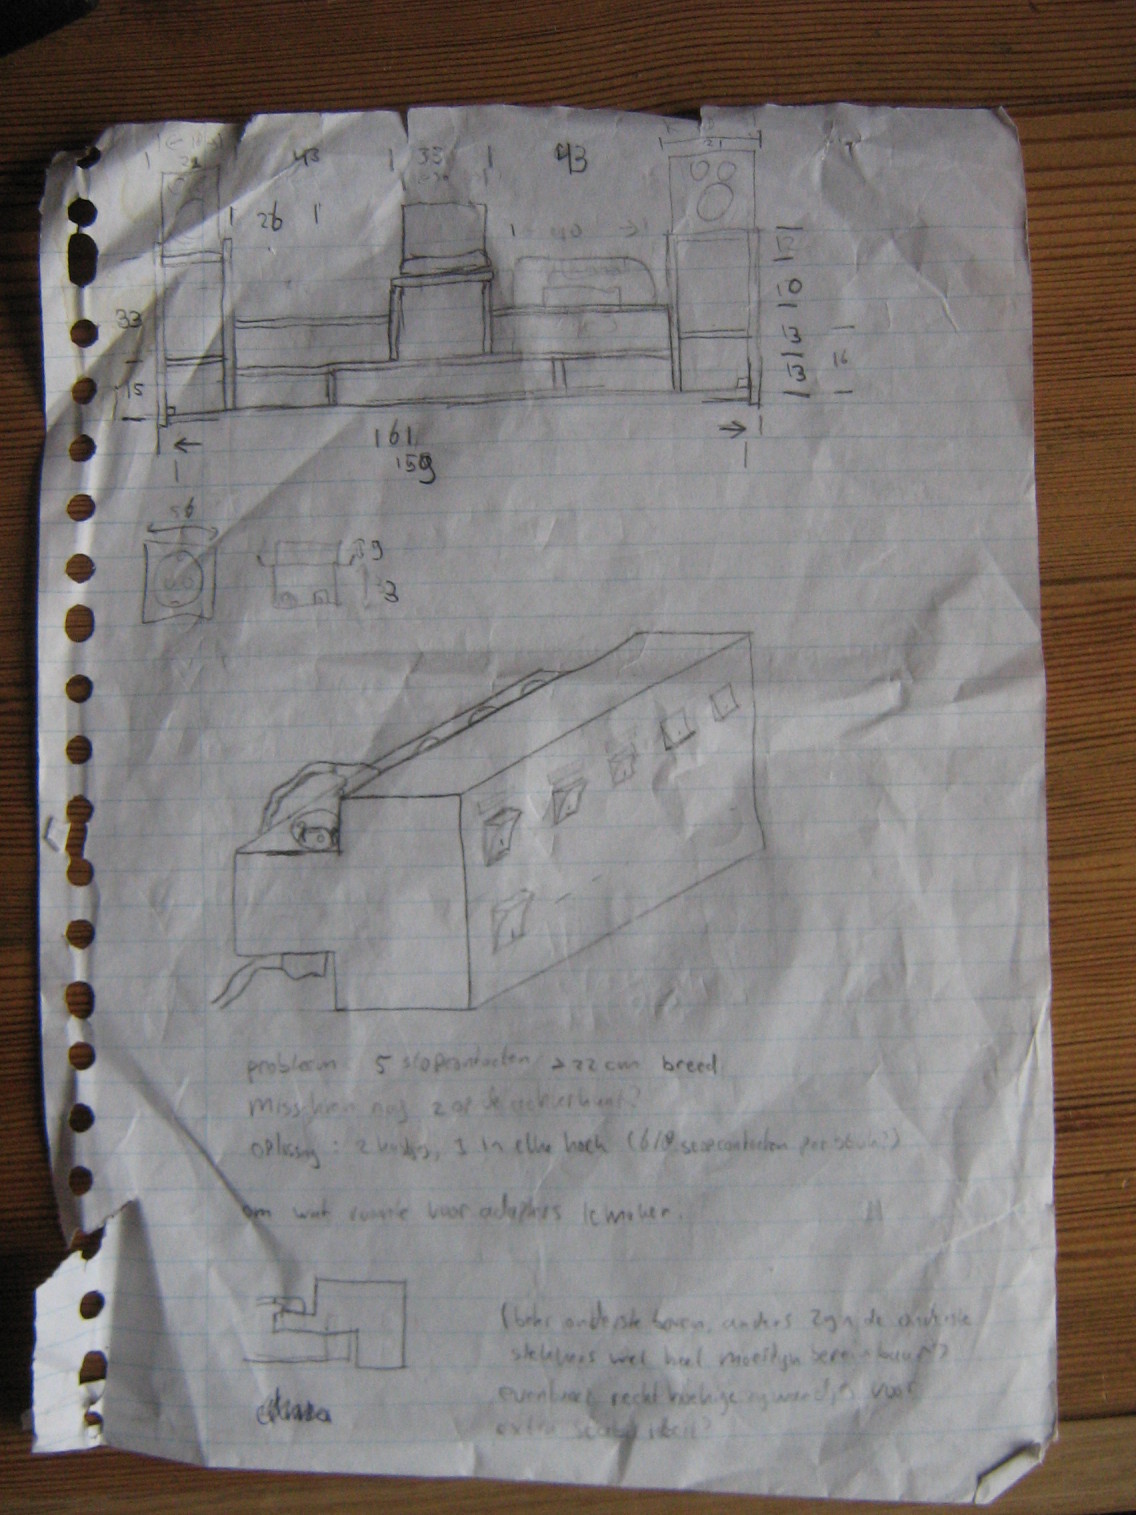
It thought I found the perfect solution when I found this power bar with five individually switched outlets from Brennenstuhl. However, because both the switches and the outlets need some space, this power bar is pretty huge (±60 cm long), making it pretty impossible to give it a useful place on my desk (without taking up too much desk space), so I would have to think of something else.
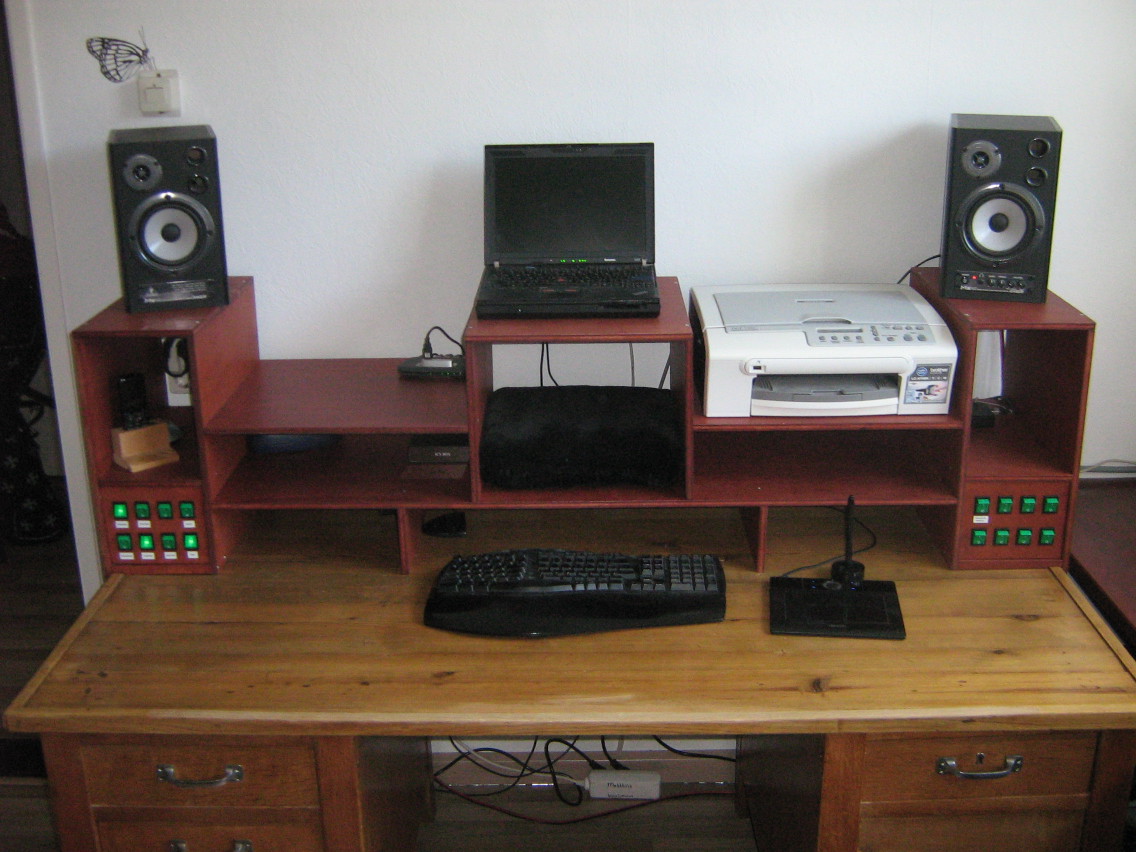
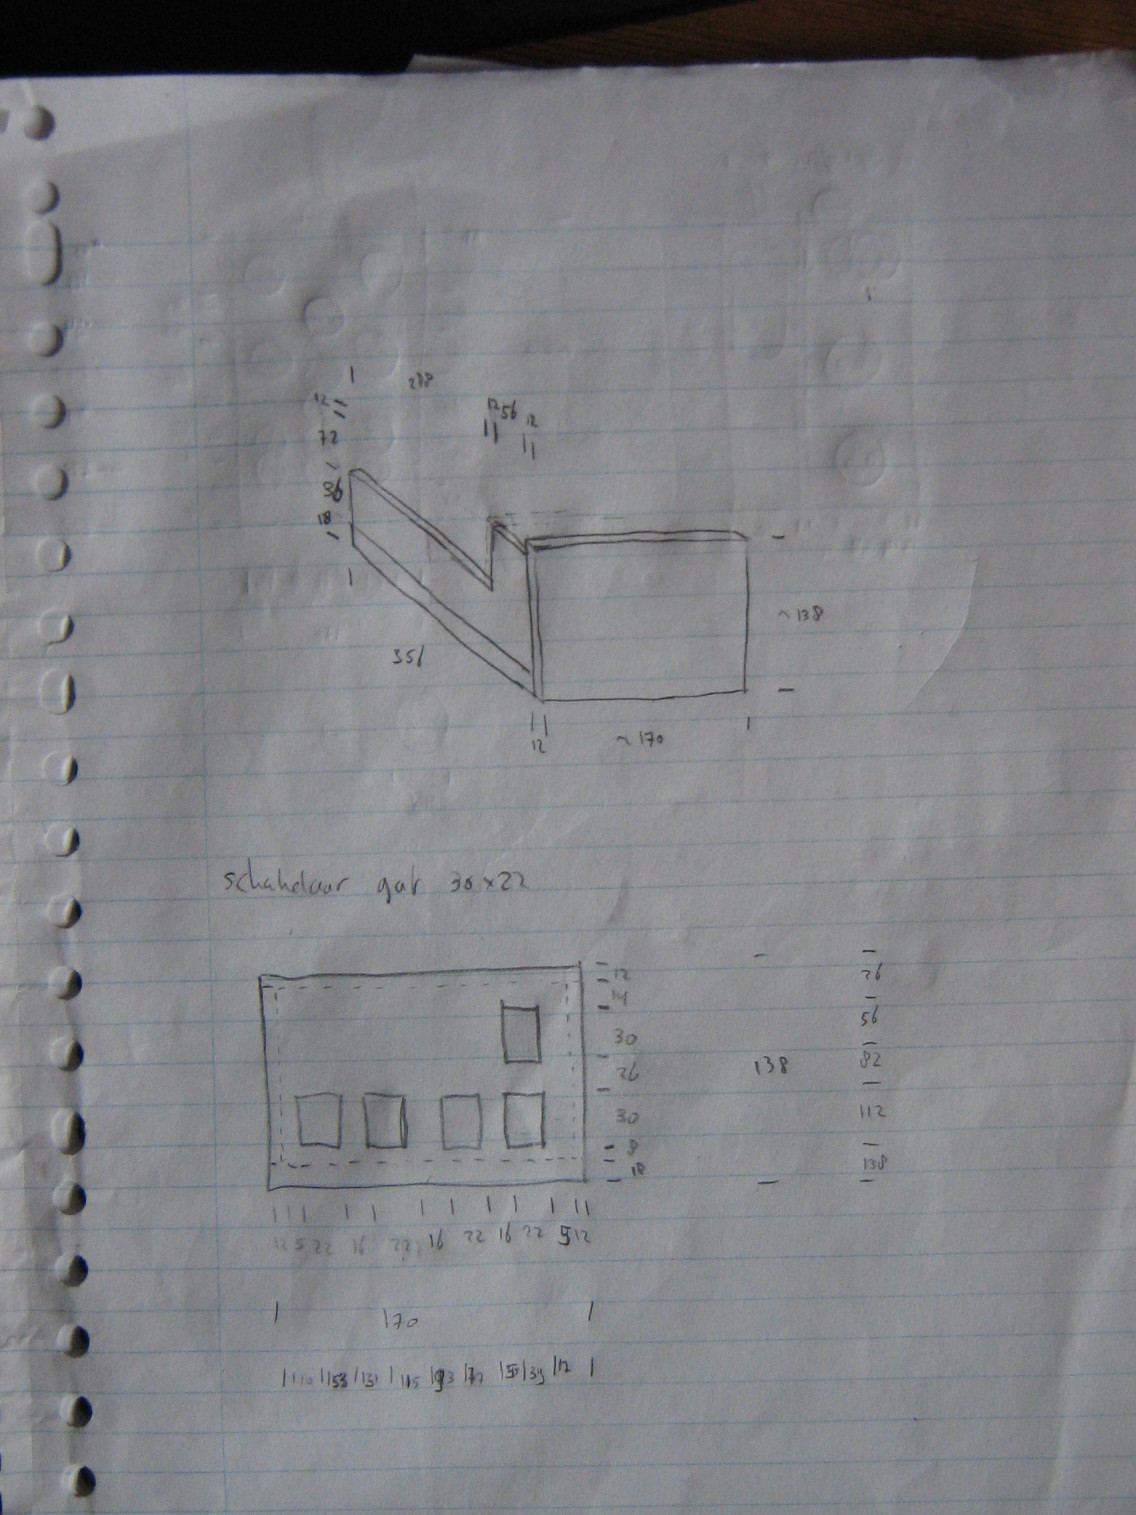
I have been thinking about building a nice cabinet to put on top of my desk to put my laptop, speakers and printer on top of and to put various paperwork and other misc items in (to replace the cardboard boxes that kept my laptop at an ergonomical height until then). In the design of that cabinet, I realized that I could just as well include some power switch panels in the cabinet.
After a few iterations of the design, I ended up with the following result:
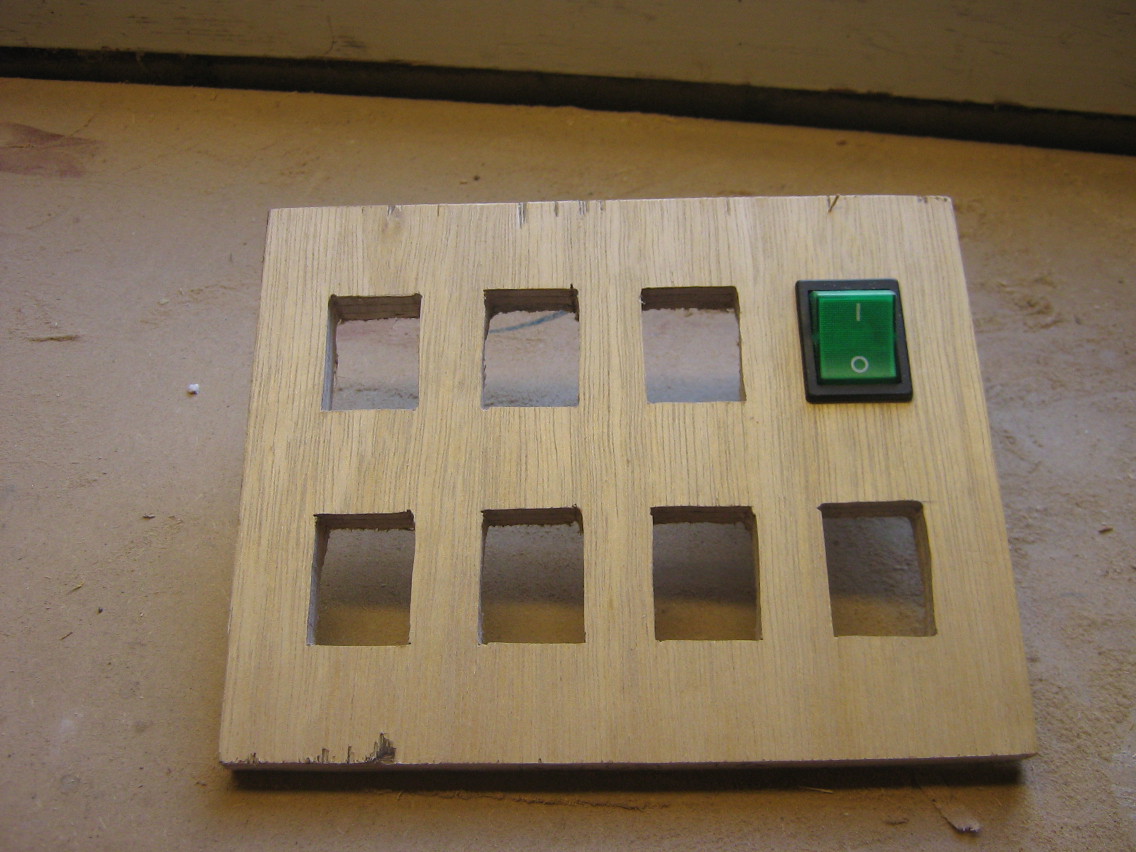
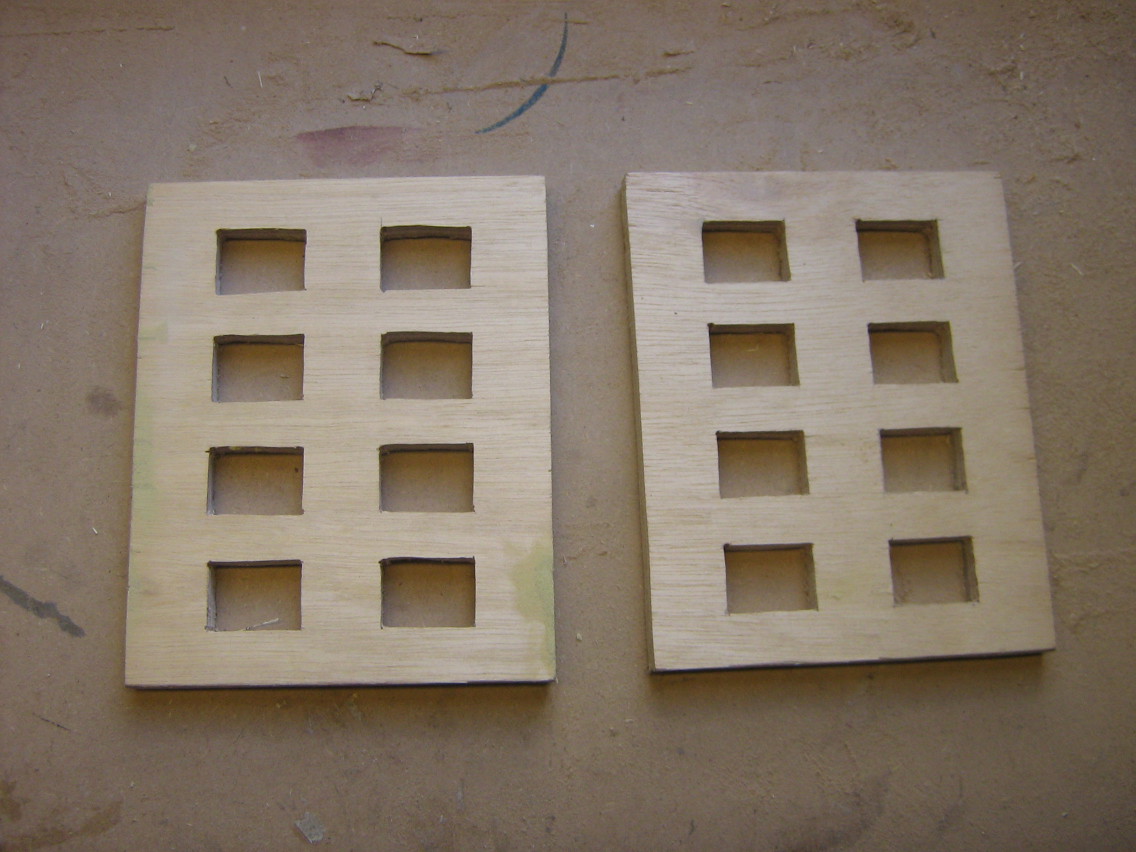
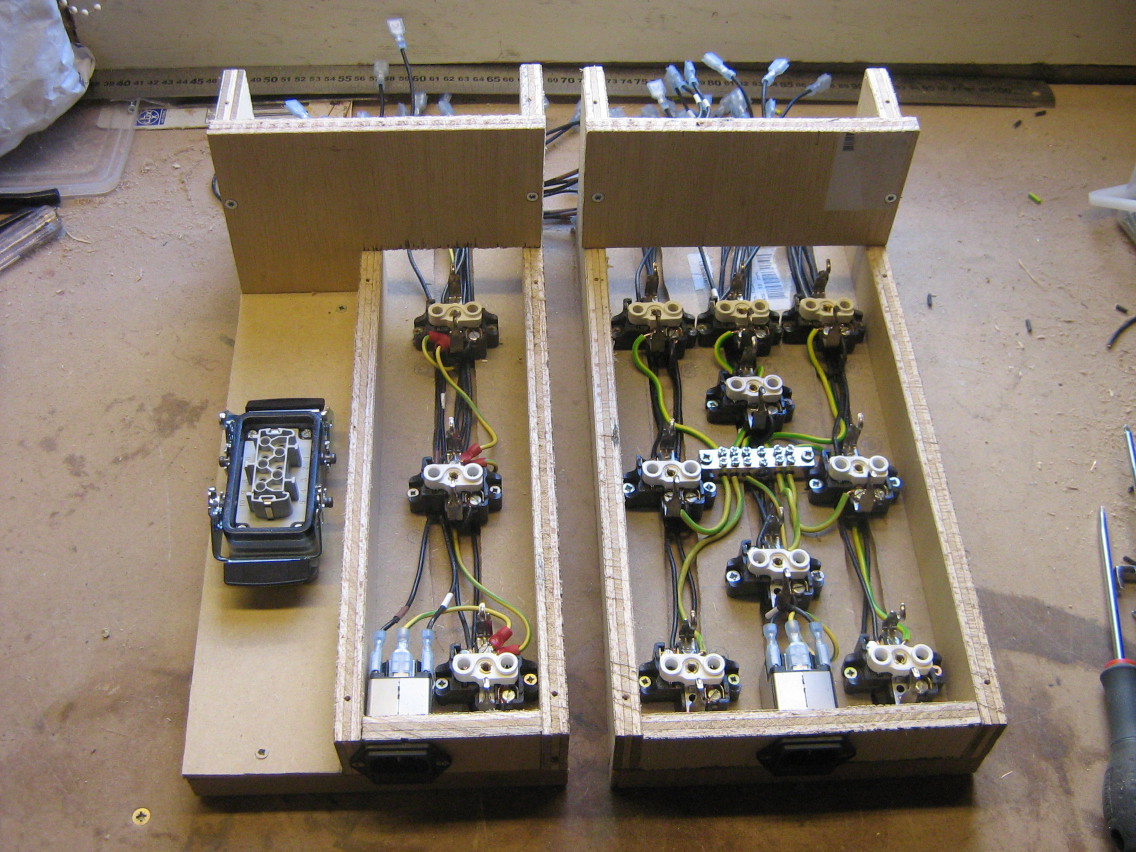
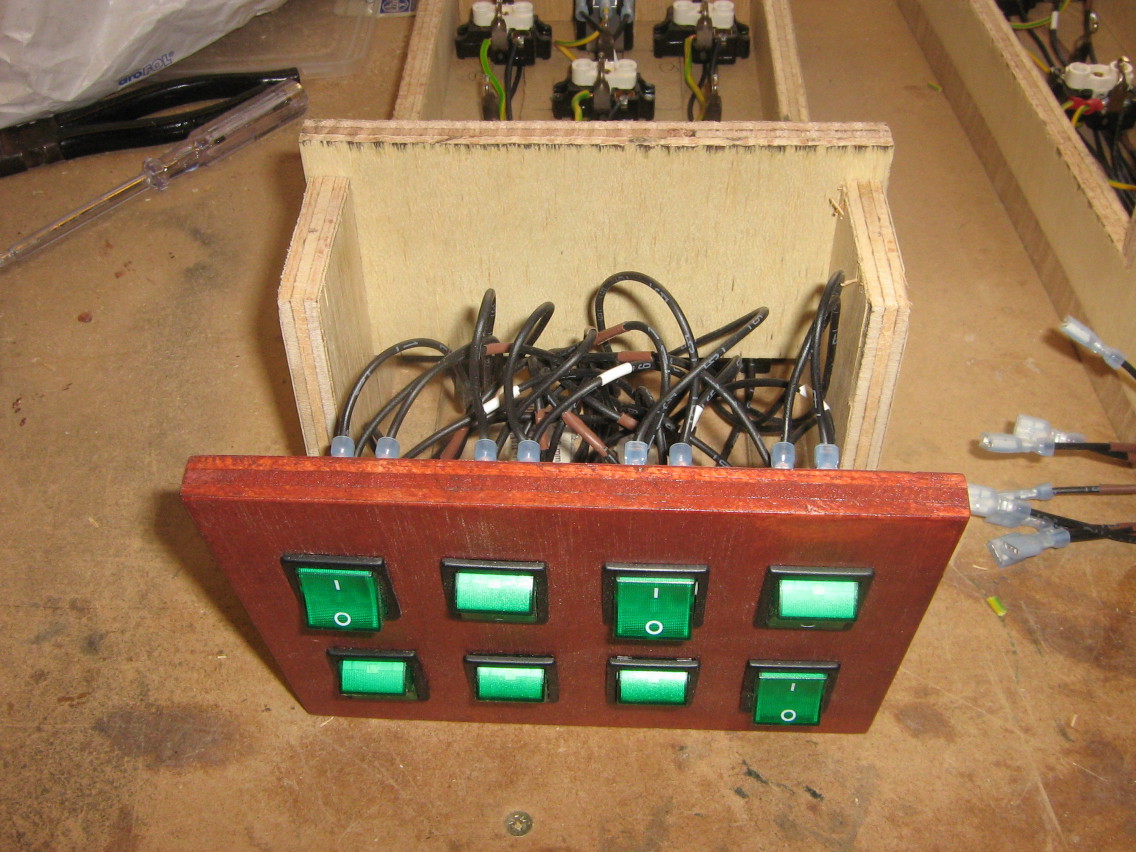
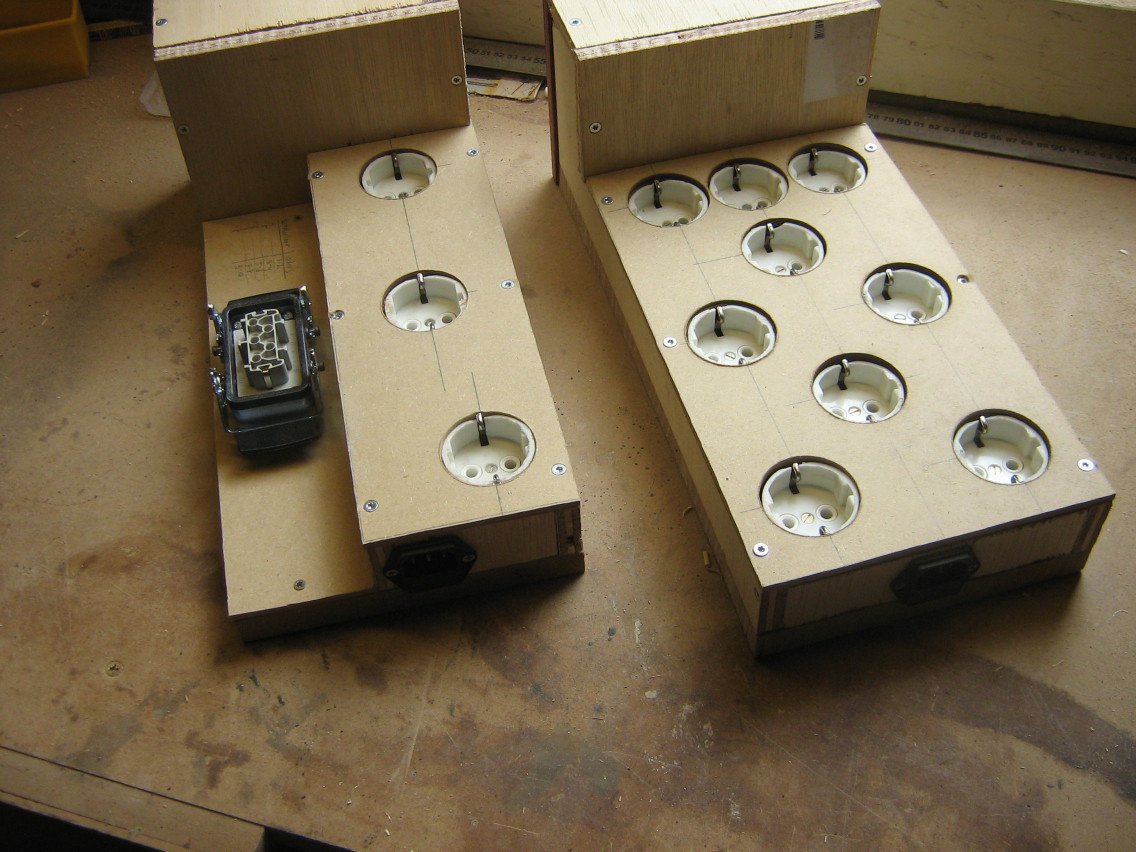
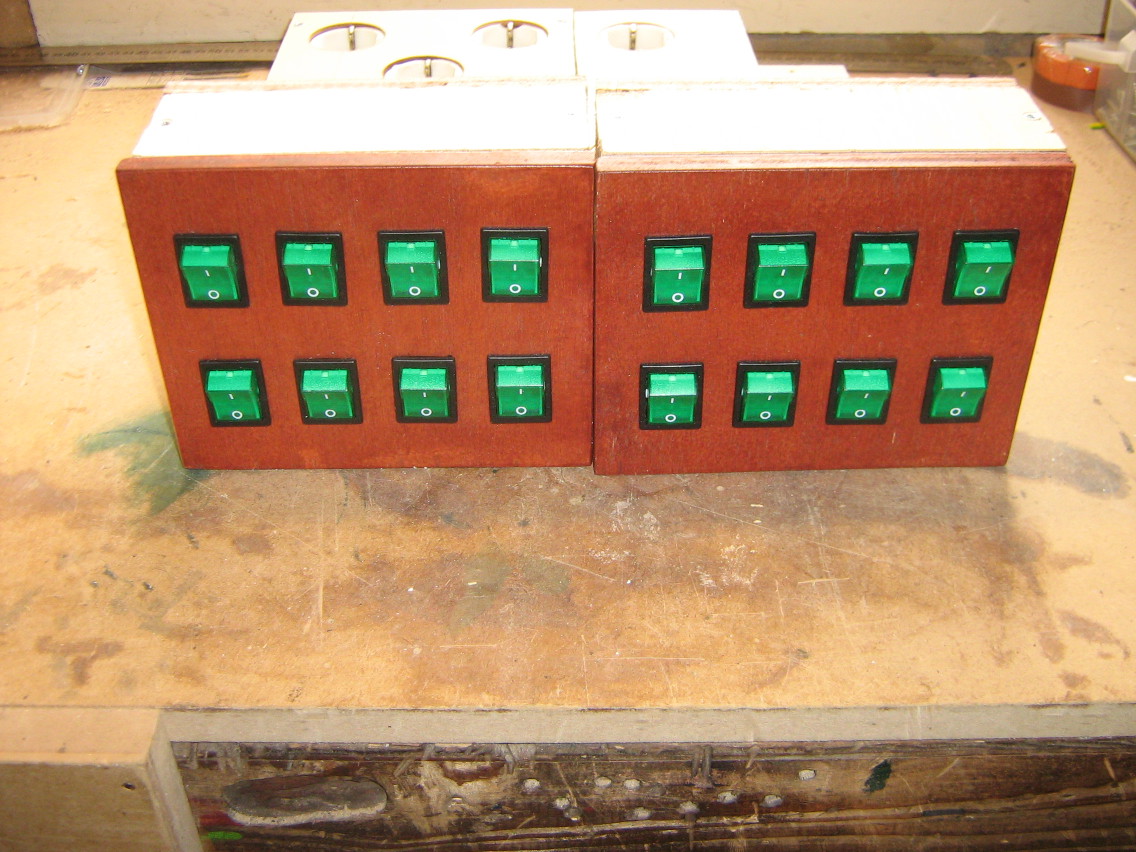
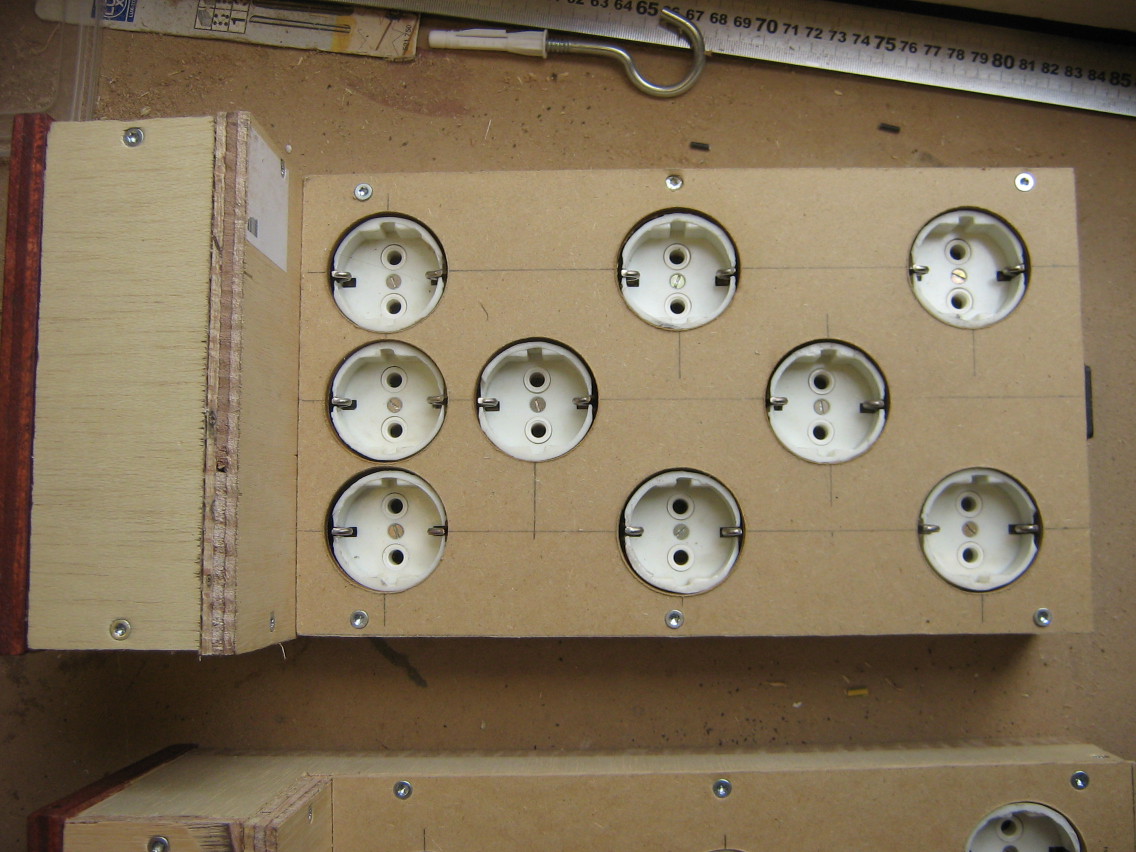
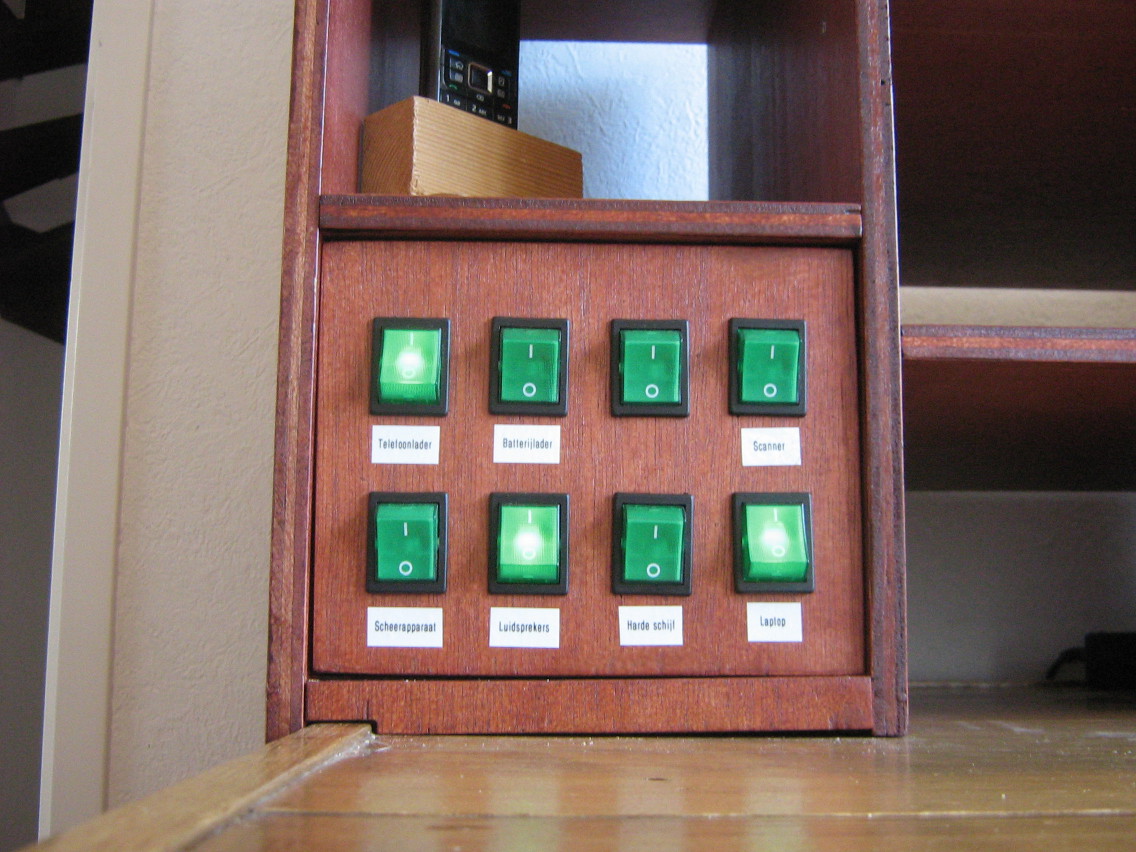
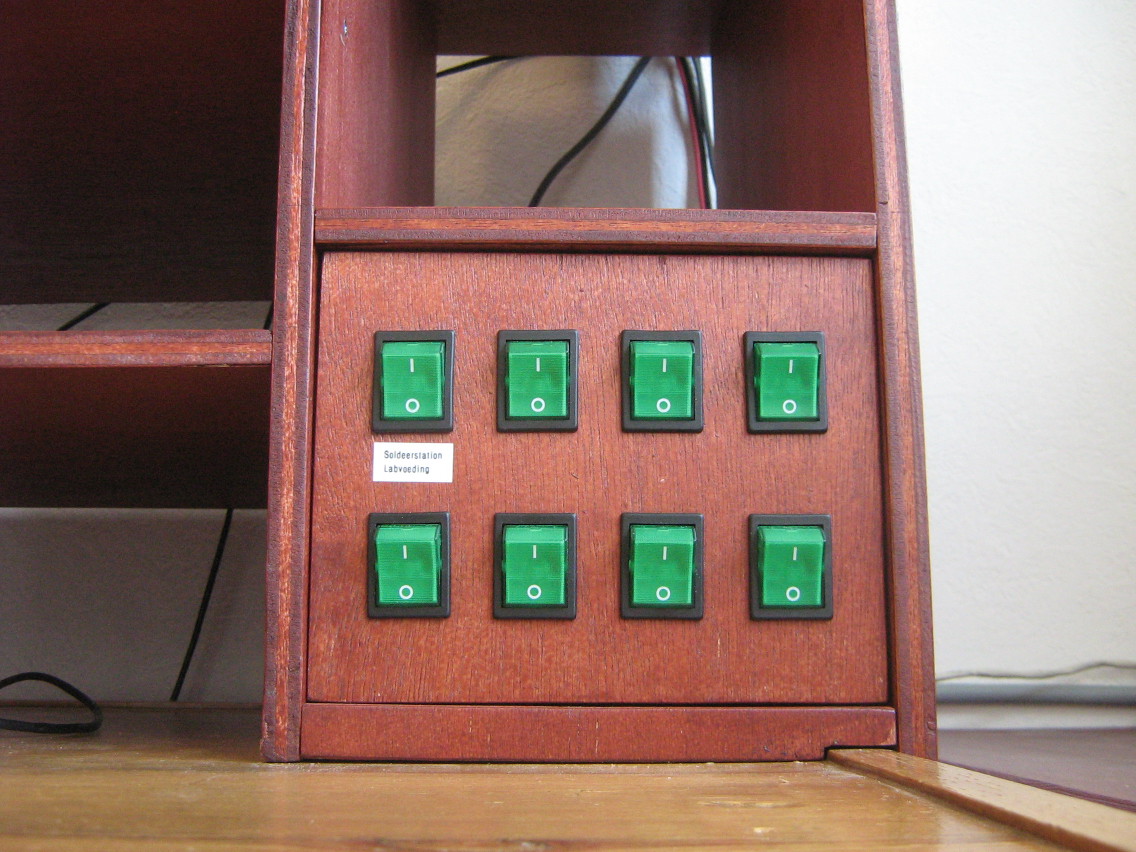
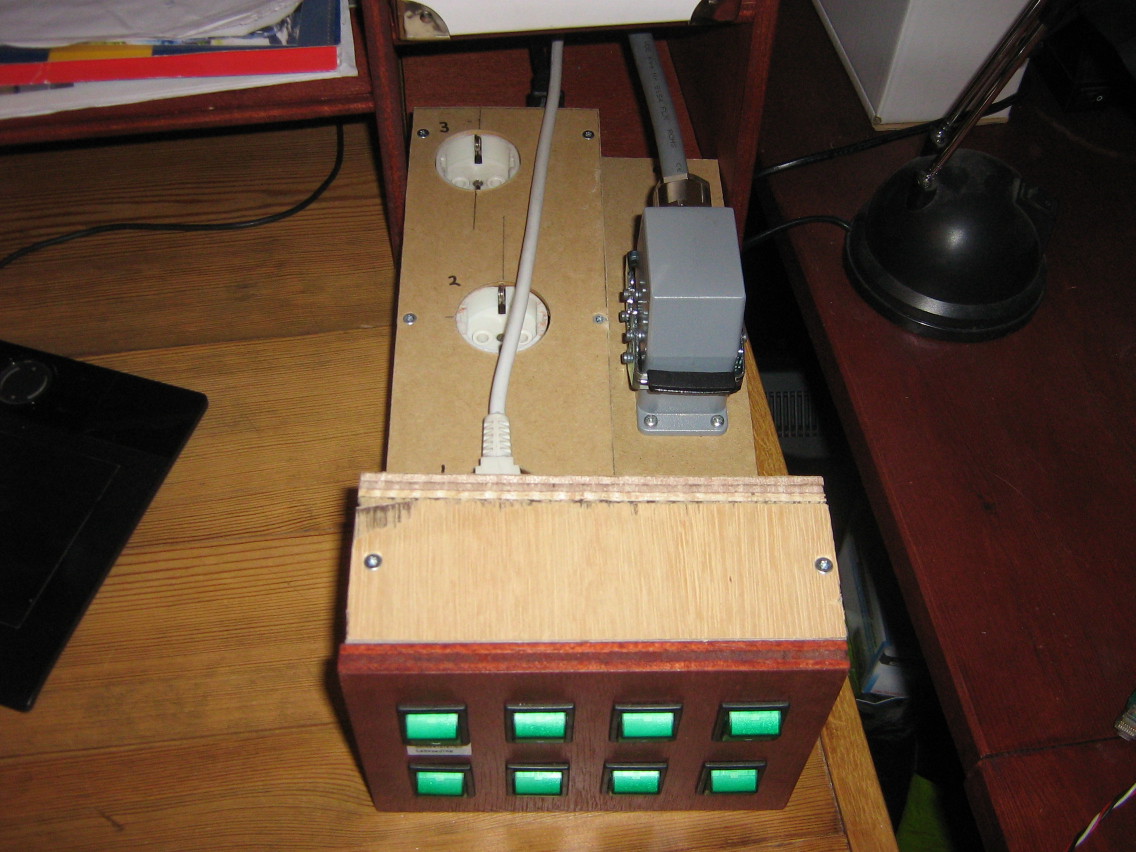
As you can see, there's two switch panels with eight switches each in the lower corners. Each switch controls one or two outlets, most of which are hidden behind the panels. Since most of the devices don't move around much, it's perfect if the outlets and plugs are hidden inside the cabinet, since that means less cluttering of my desk.
However, I also have some devices (mostly wireless access points, settopboxes and monitors that I use for my work) that are not fixed all the time and regularly change. If I would need to get behind the switch panels everytime I wanted to change a device, I would get tired of that real quick. I could of course have used a completely separate outlet bar for those devices, but I still like to make those devices individually switched (since most of them have power adapters, which are prone to leak power, and I hardly ever use all of the devices at the same time).
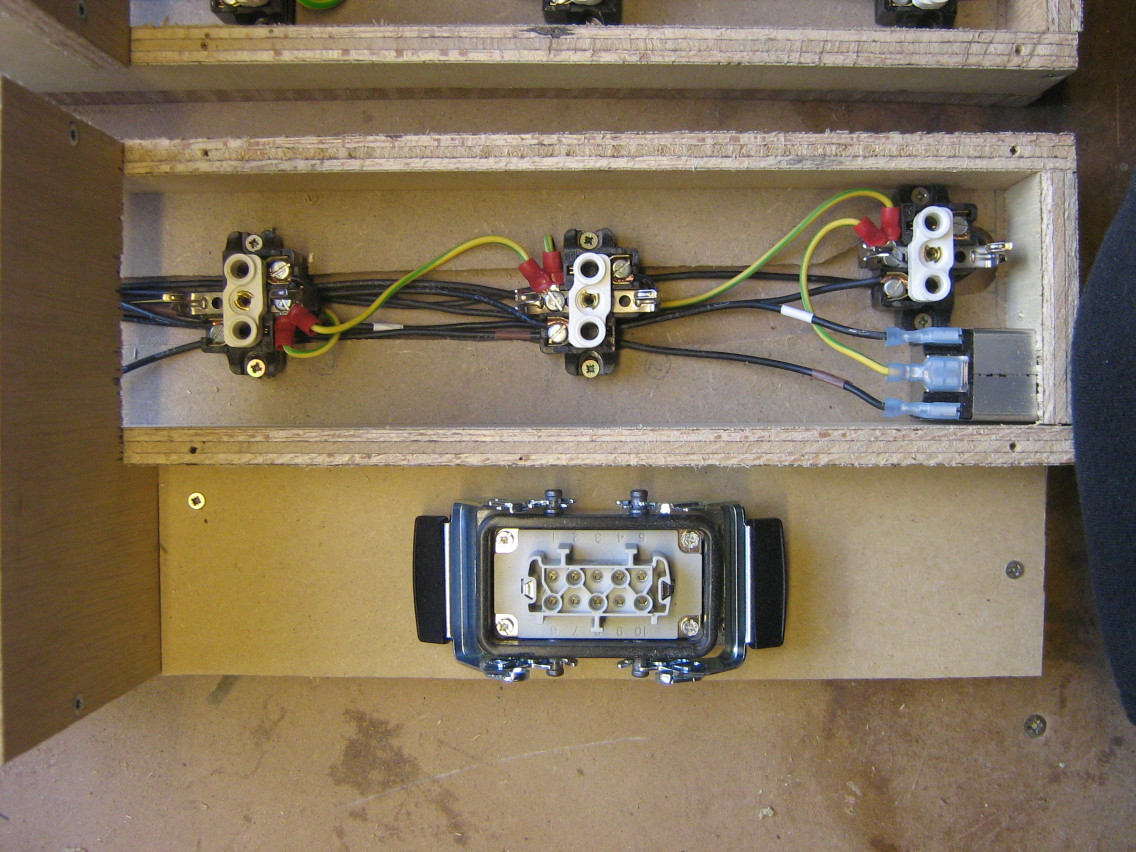
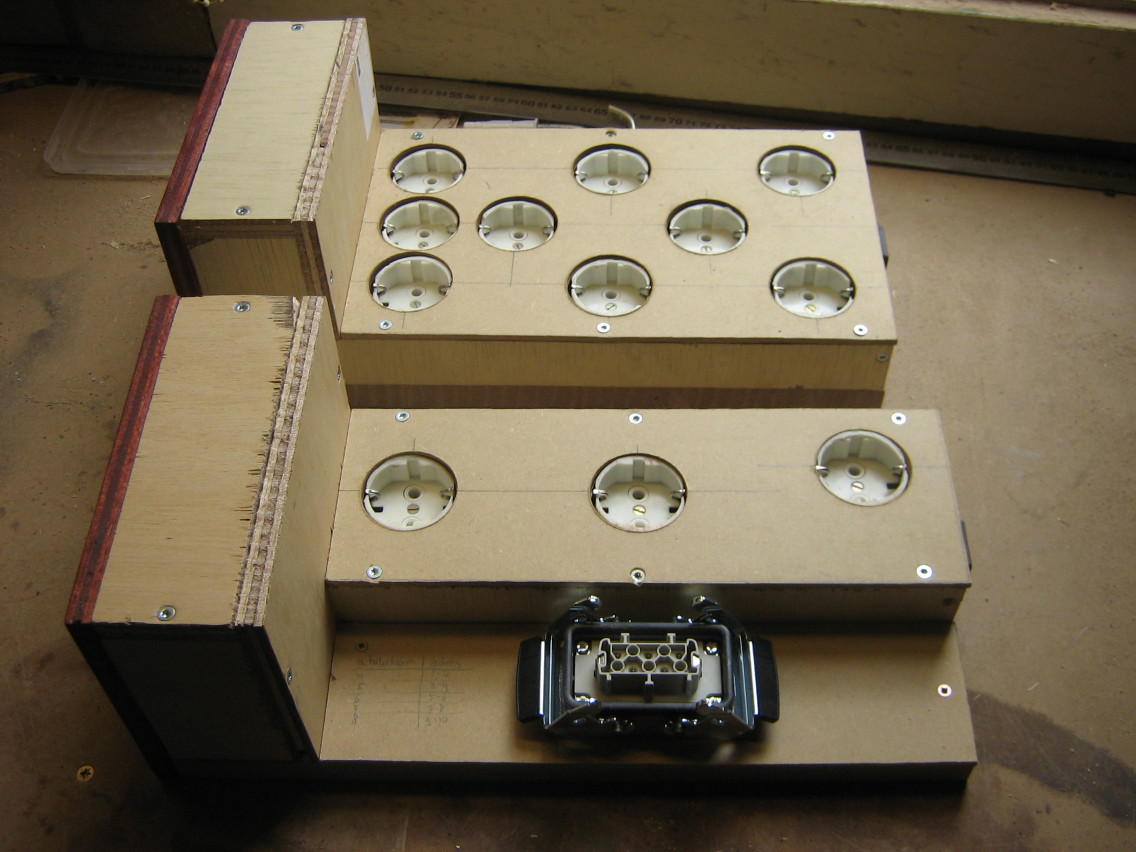
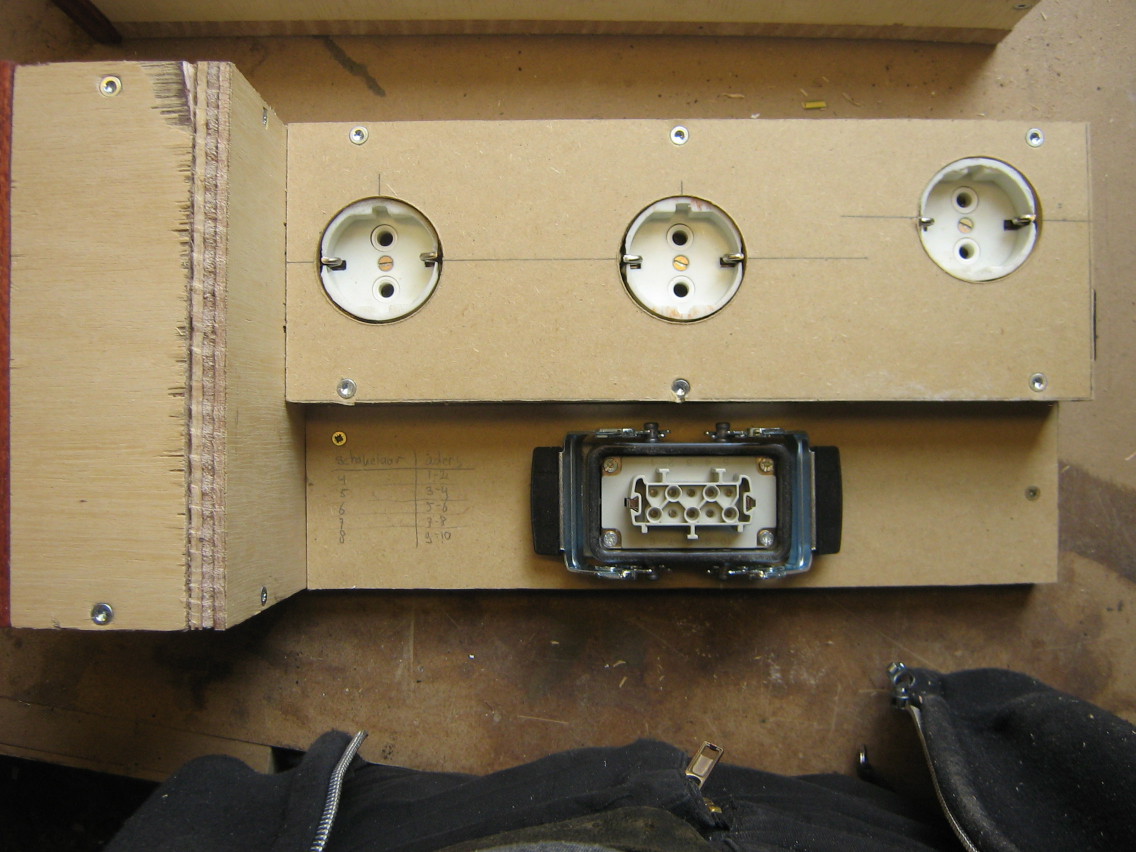
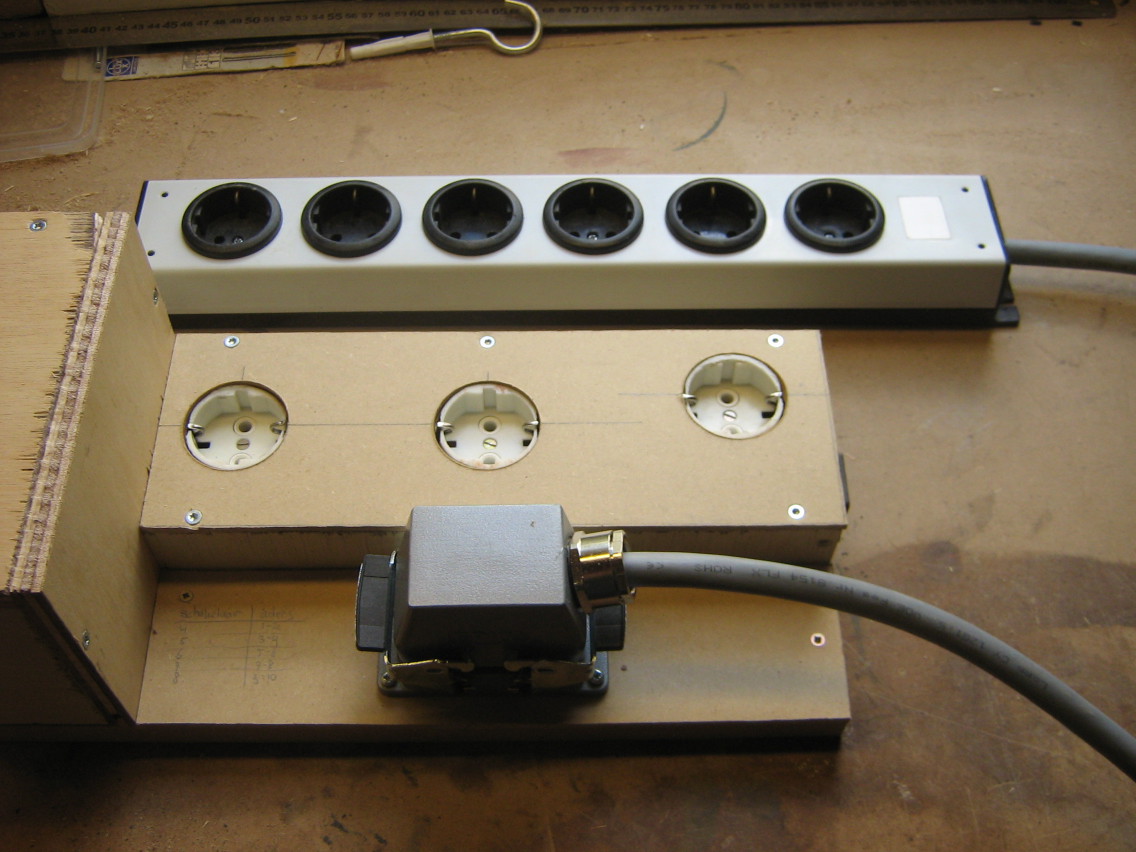
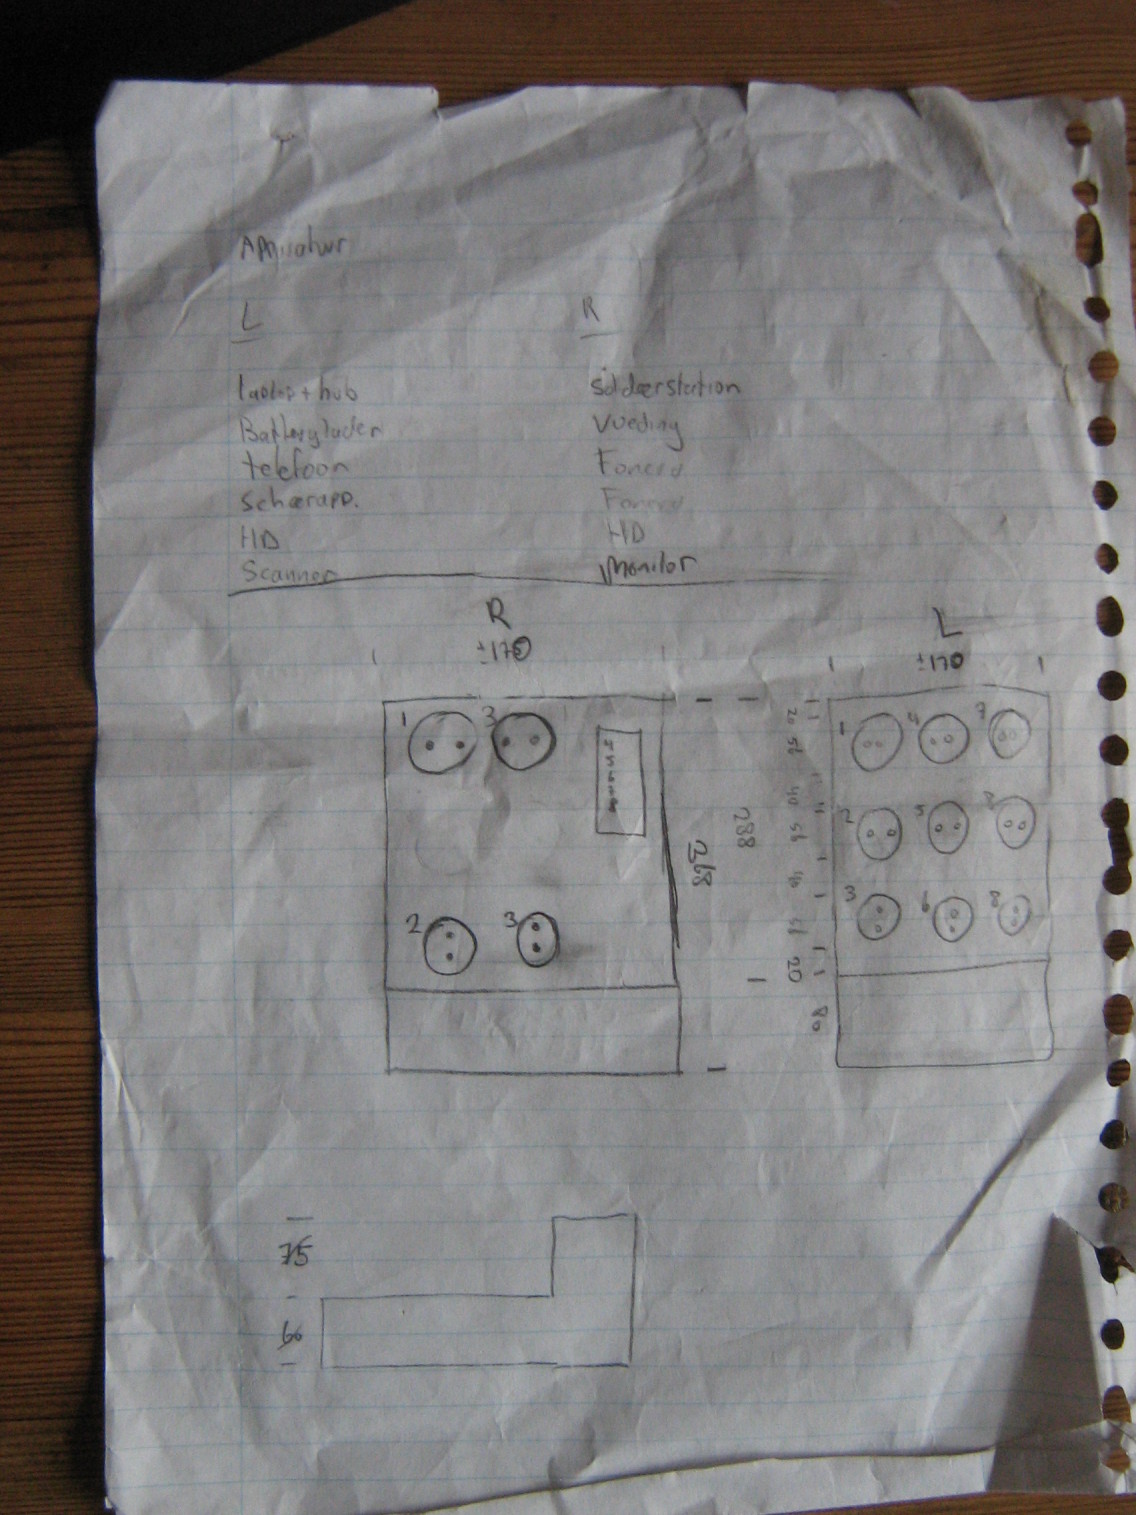
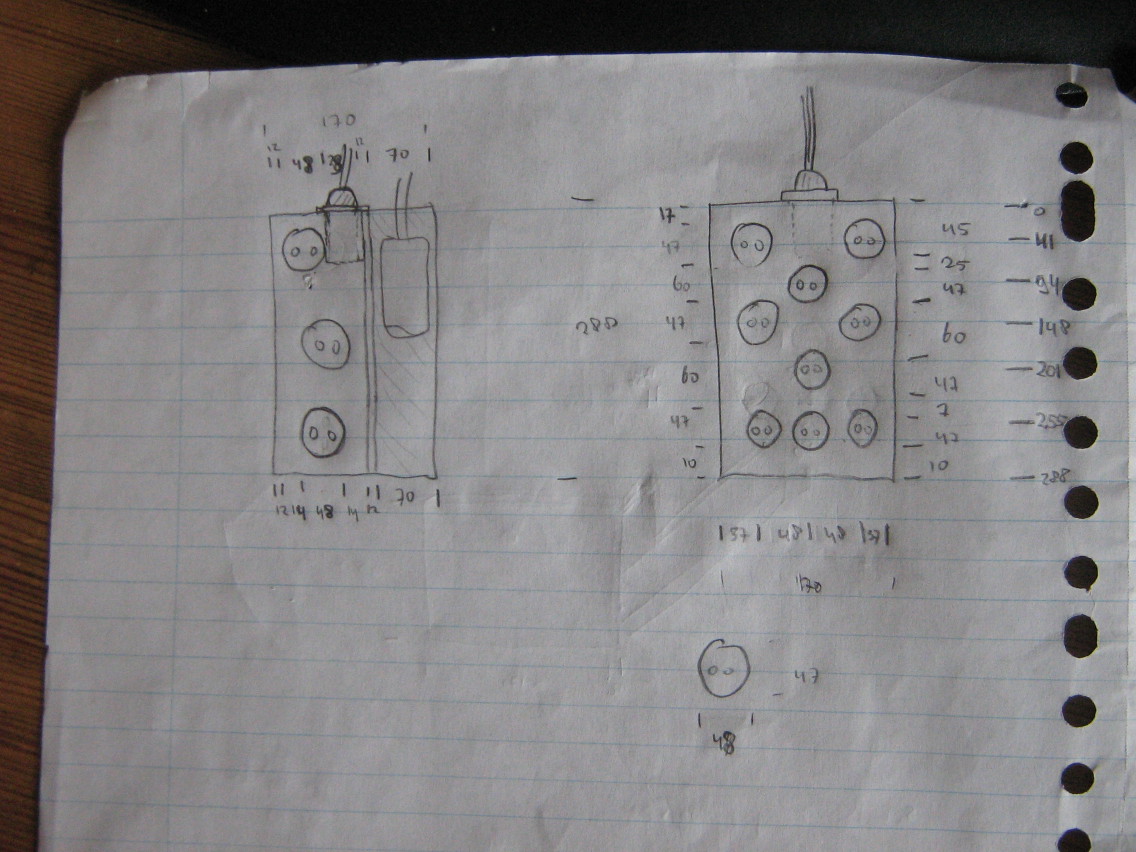
So, I ended up making five of the switches in the right panel control outlets in a separate power bar, which I put on my (second) desk instead of behind the panel. To be able to do this, I had to get a length of thick power cable containing 12 separate leads (two for each outlet, plus one for the earth terminal). Also, since I didn't want the cable to be fixed onto the switch box, I got a humongous power plug, containing 10 contacts (plus chassis earth).
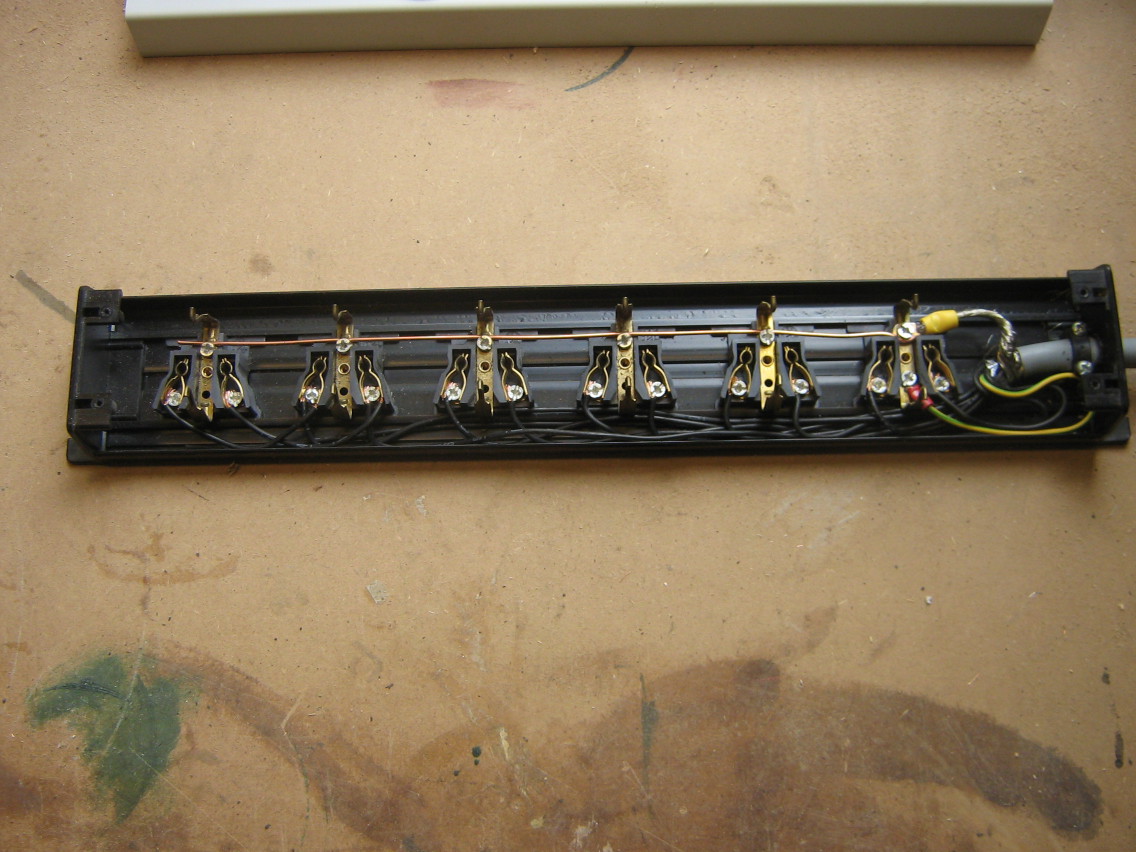
I designed these boxes for a current up to 10A. All components should be able to handle 16A, except for the power inlets, which contain a 10A fuse. Each switch panel contains 8 switches, for controlling 9 outlets (theres one switch in each box that controls two outlets).
I used two-pole switches, which can switch both the line and neutral terminals of each outlets. In theory, it should be sufficient to only switch the line terminals and leave the neutral terminals always connected, but since the boxes are connected to a wall socket using a normal power plug, there is no way to tell which incoming power wire is the line terminal and which is the neutral terminal, so you have to switch both of them.
One thing I had not accounted for in advance, is that the switch boxes themselves also draw a bit of power. The power inlets I used contain some filtering circuitry, which should improve the stability of the power delivered. However, these inlets also draw about 50-100mW (hard to measure since it's so little and has a low power factor) each, when there is nothing else connected. On yearly basis, this would amount to about one kWh, so that's not really a problem.
In addition, the lights in the switches also draw around 300mW, but since that only happens when a device is switched on, that power draw is negligible compared to the power usage of the connected device.
I started out building the cabinet, which took me just under a day (I just screwed all the panels together, not bothering with fine dovetail joints or other fine woodworking details, since I mostly wanted this cabinet to be functional without costing too much time. Then I started on the switch boxes, which took me three or four days in total, which seems really out of proportion :-)
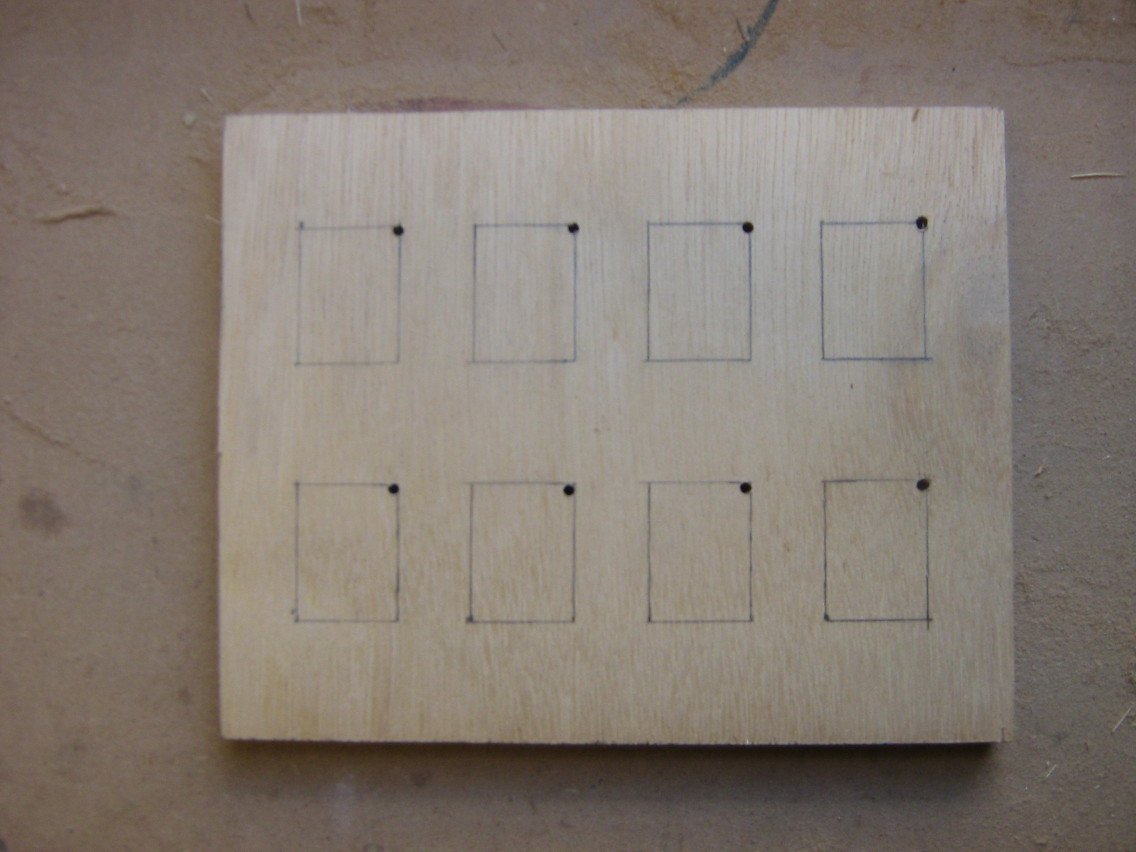
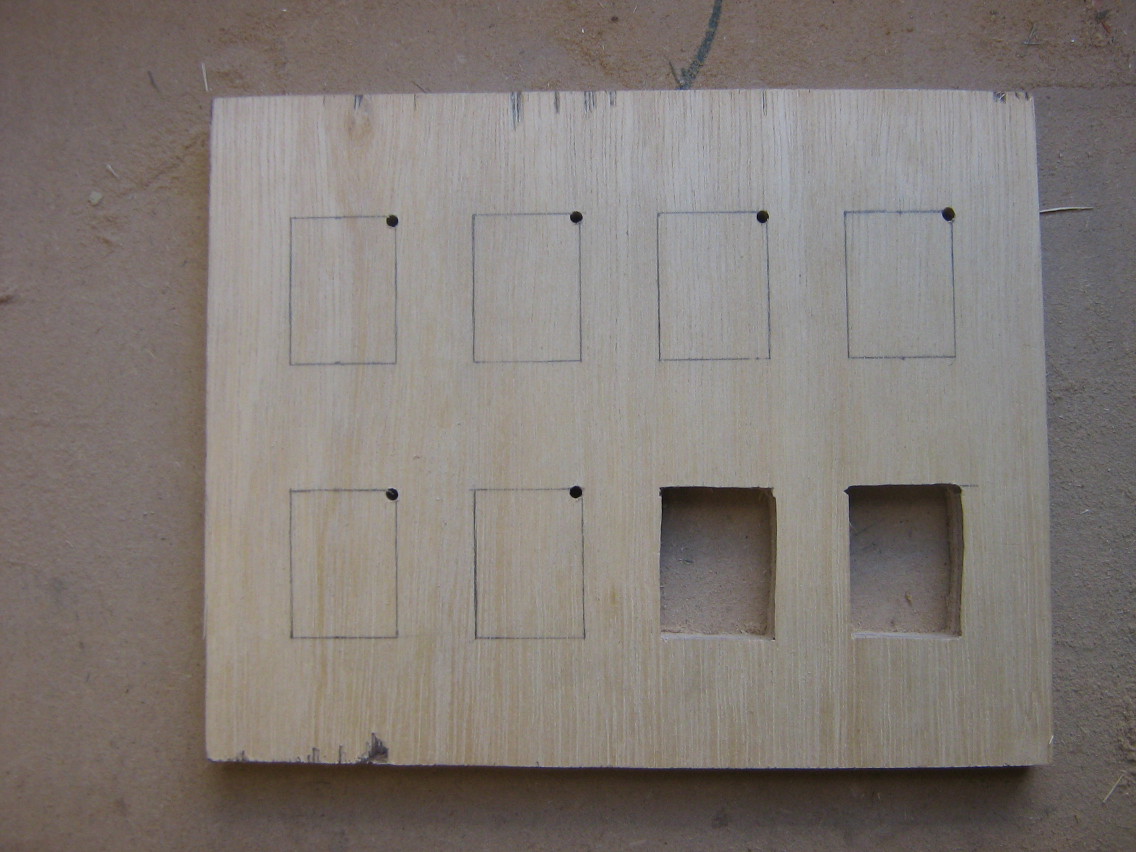
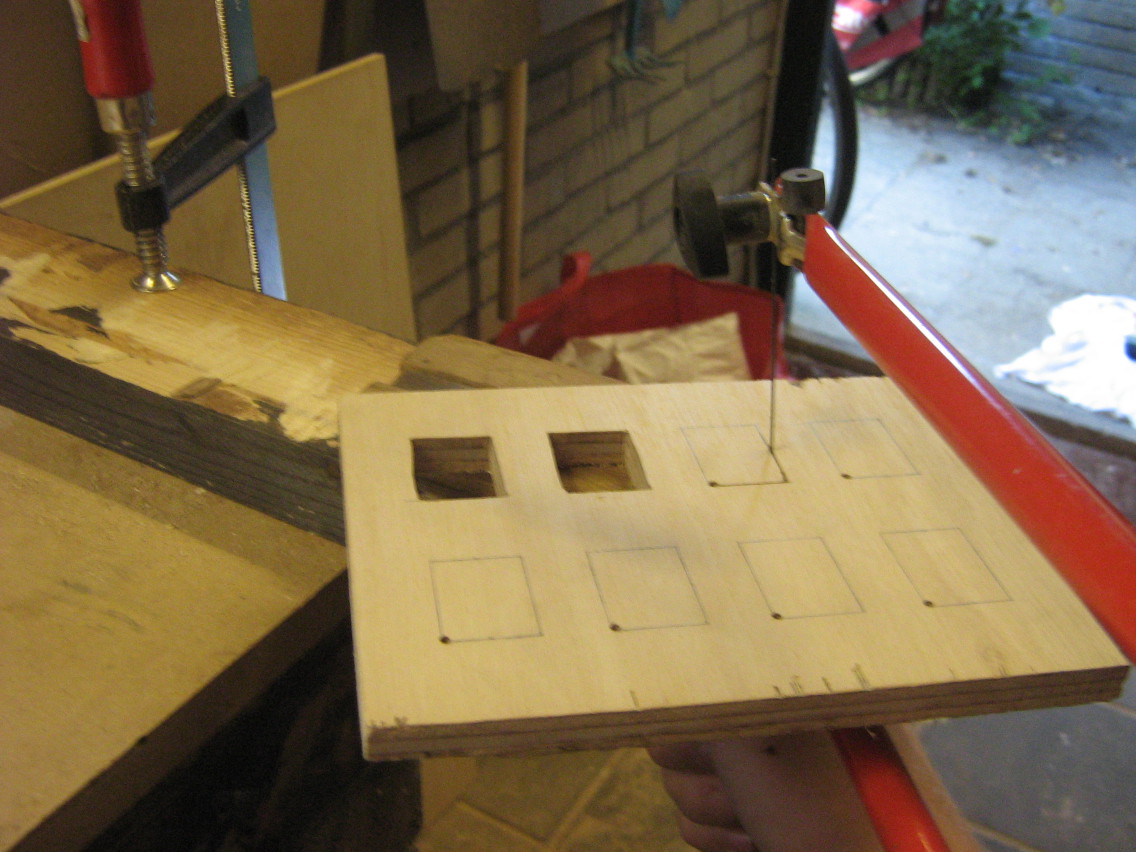
Front panels
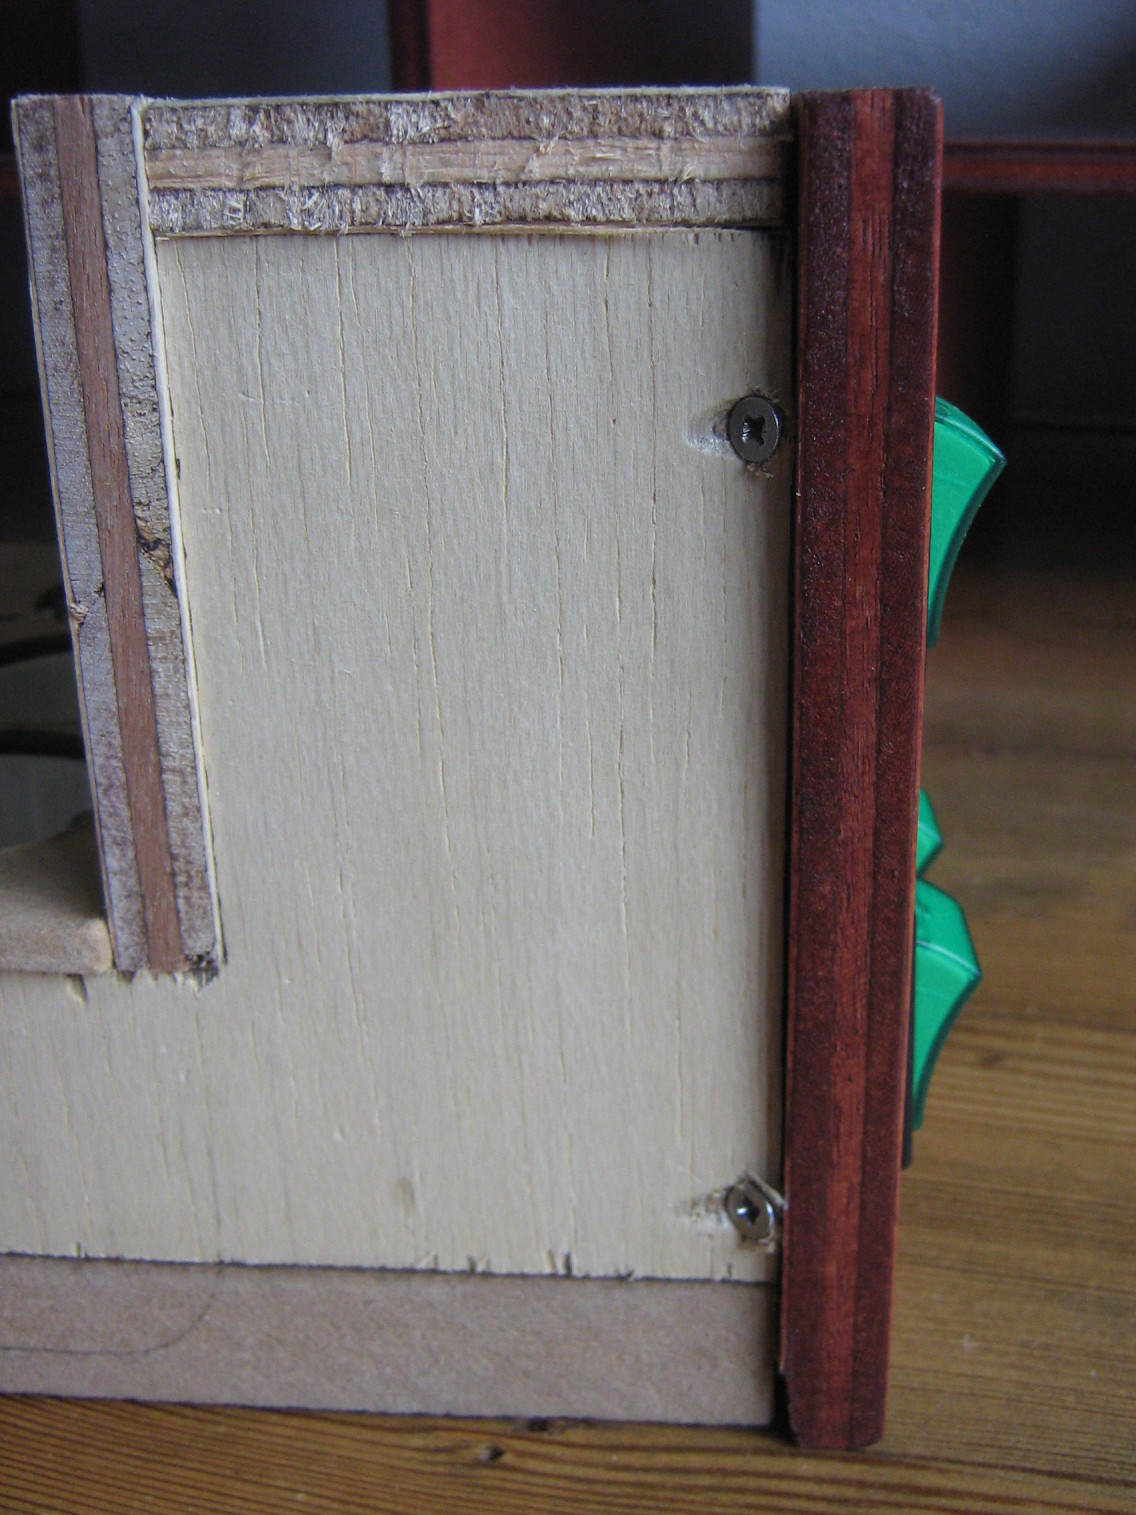
I started out preparing the front panel, using an oldschool fretsaw. Fortunately, the switches have a small front panel that covers up a few milimeters of the hole, so I didn't have to get perfect cuts (though a few mm of space is still not that much room for error).
The switches are mounted in the panel by just snapping them into the holes cut out of the panel.
Outlets
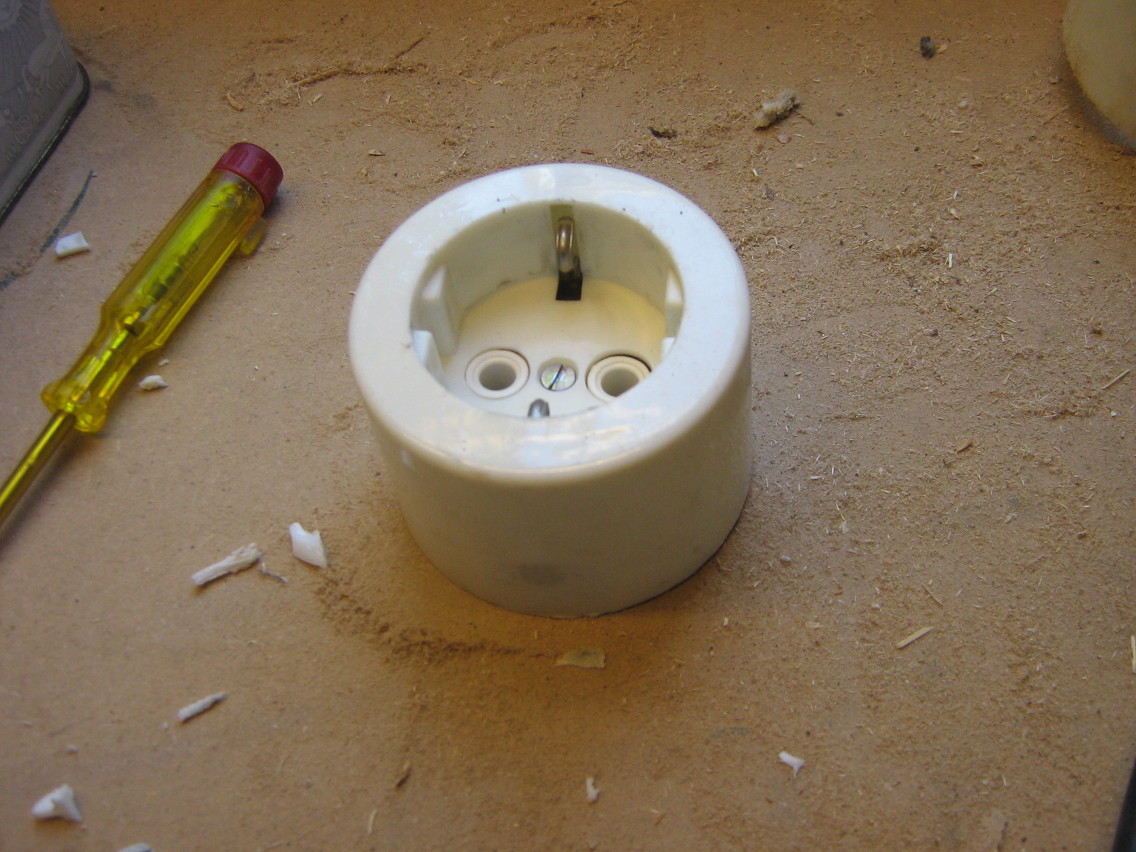
For the outlets, I was considering to use these power sockets or standard wall sockets, with the big downside of them being fairly expensive (± €8, I would need 20 of them). Fortunately, I found a box of old wall outlets at van Altena, local second-hand hardware store that has all kinds of old and new tools and equipment at cheap prieces. I ended up paying €0,75 per outlet, which reduced the total cost of the project quite a bit (though it still cost me around €175 in materials).
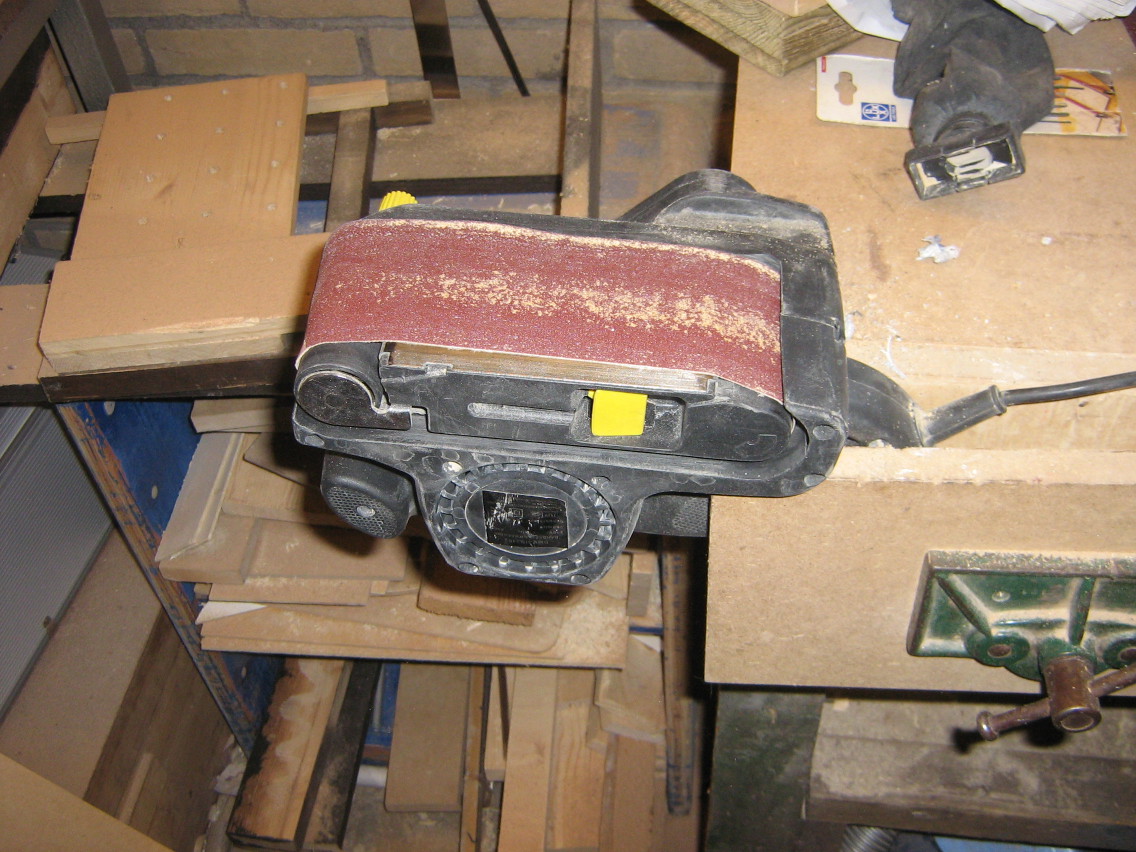
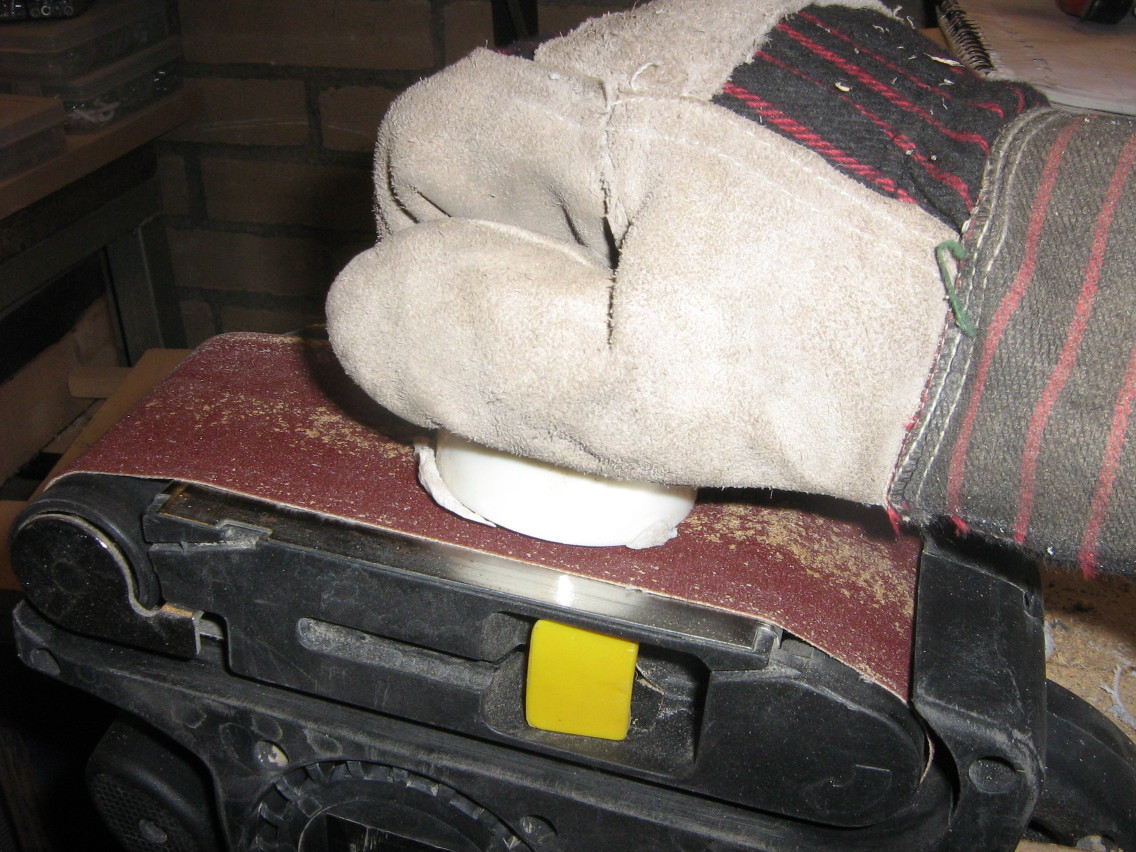
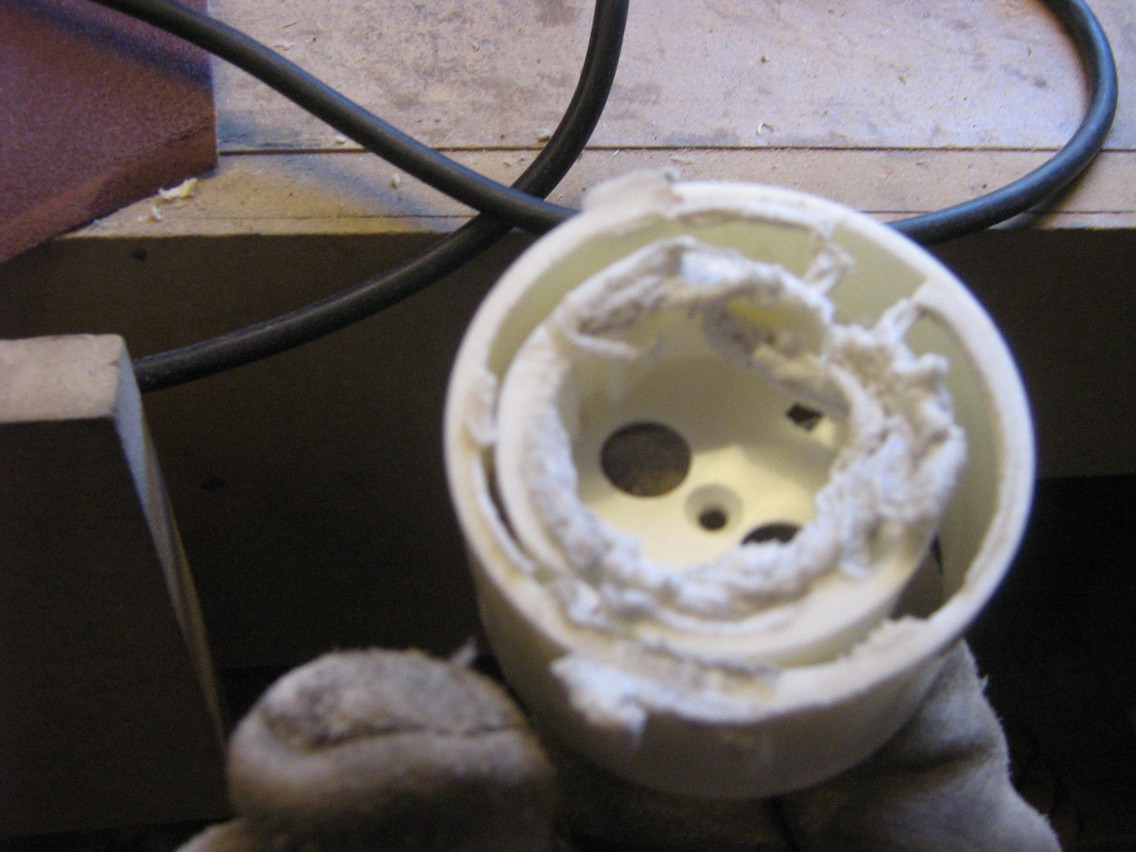
To save a bit of space and make everything fit better, I ended up cutting off the top of the outlets, so the outer mantle would come off and the outlets could be placed closer togeter. After doing the first one with a saw, I ended up doing all the others using a belt sander, fixed upside down in my vice creating an ad-hoc stationary belt sander.
Box construction
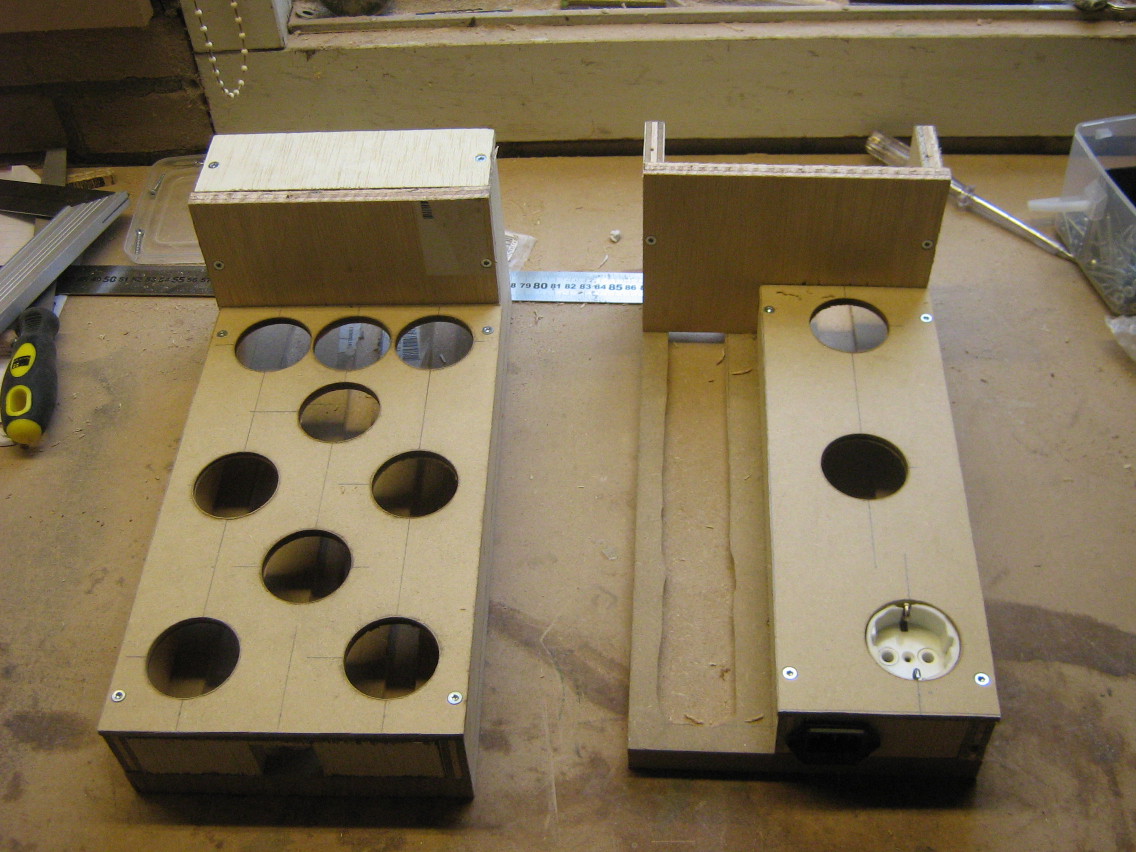
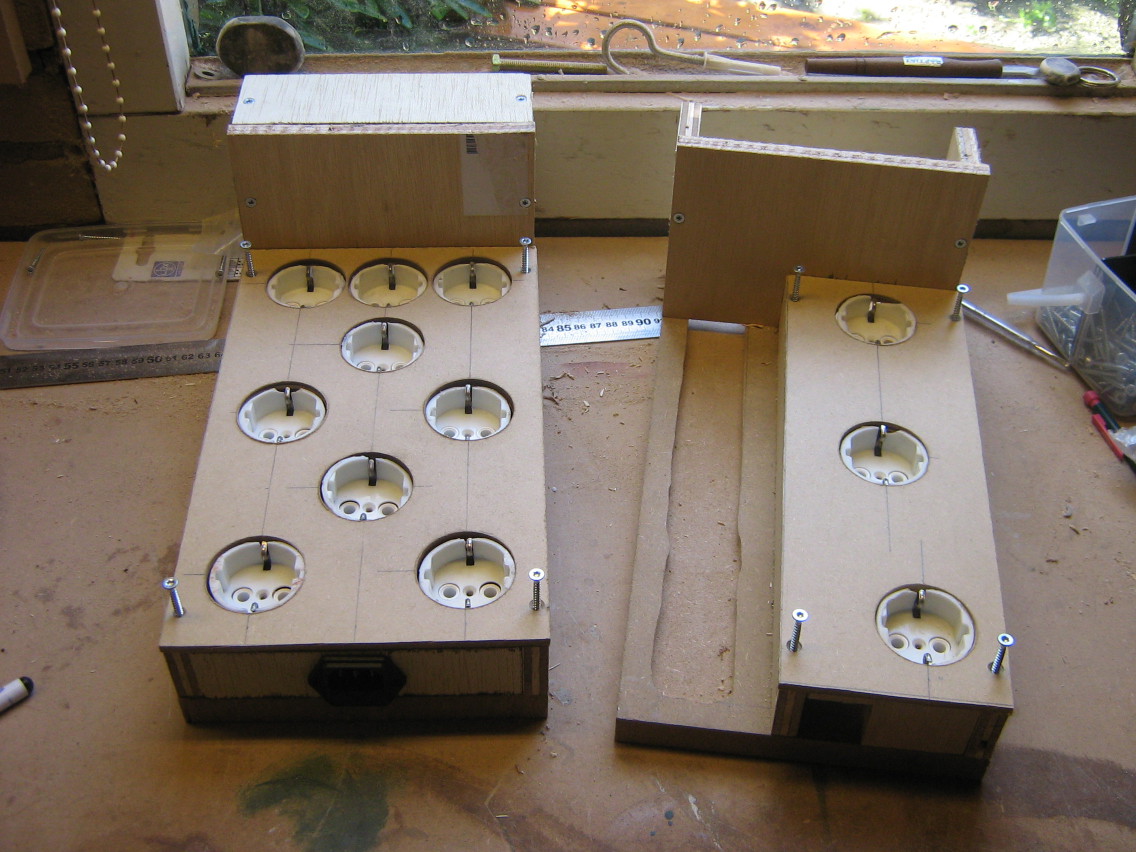
Next, I created a base for the boxes and constructed the boxes on top. Apparently I didn't take any pictures of the process (I remember doing so, but perhaps I somehow lost the pictures, not sure). The base plate is thick (18mm) MDF, on which I've used my router to route out a 10mm deep "trench" in the wood through which the cabling can be put (so it can go underneath the outlets). You can see one of the trenches on the left of the right box below.
Most of the rest of the construction is 15mm plywood, except for the top plate (with holes for the outlets), I used 6mm MDF for that.
Distribution wires
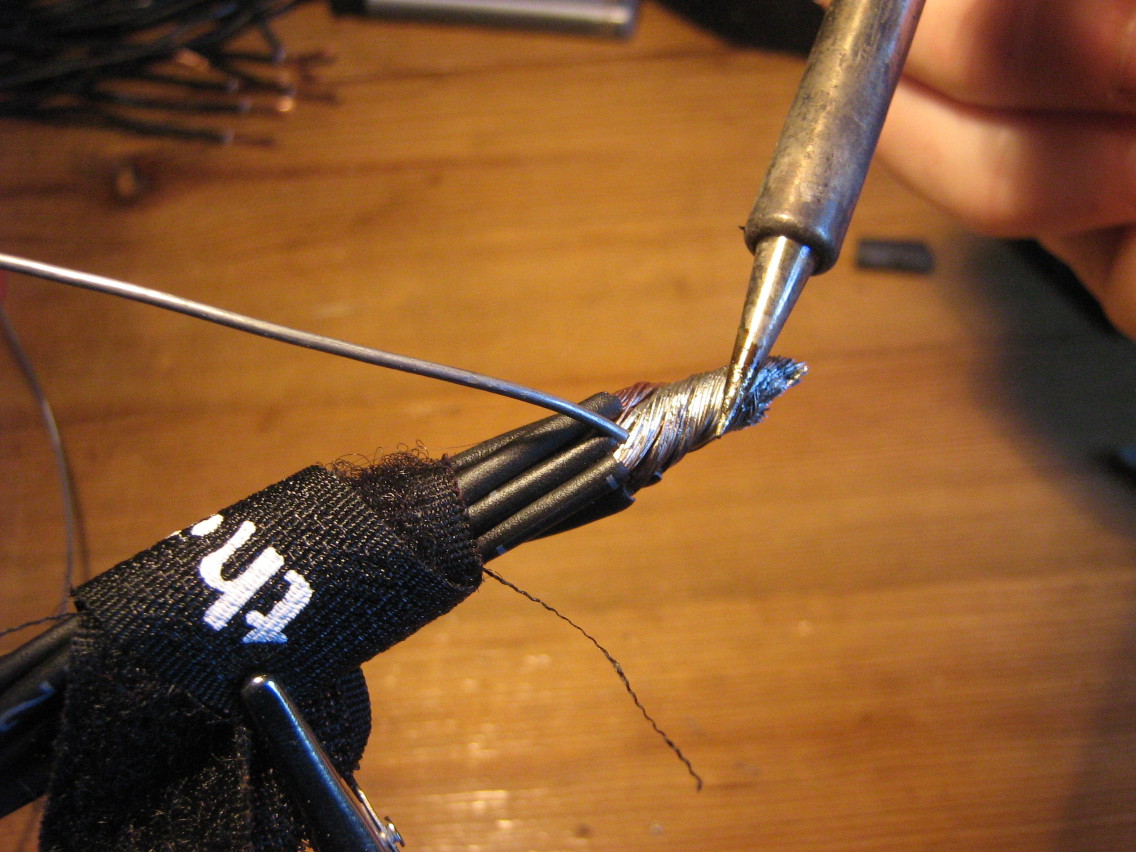
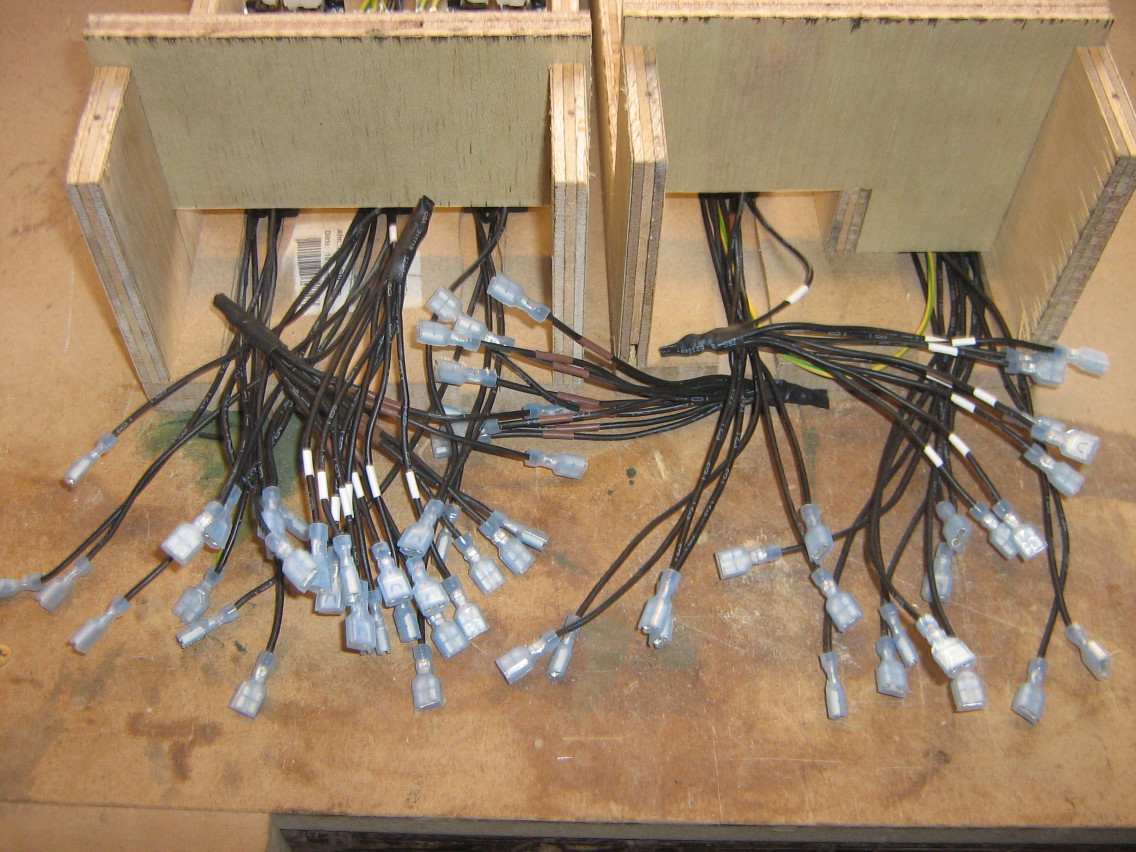
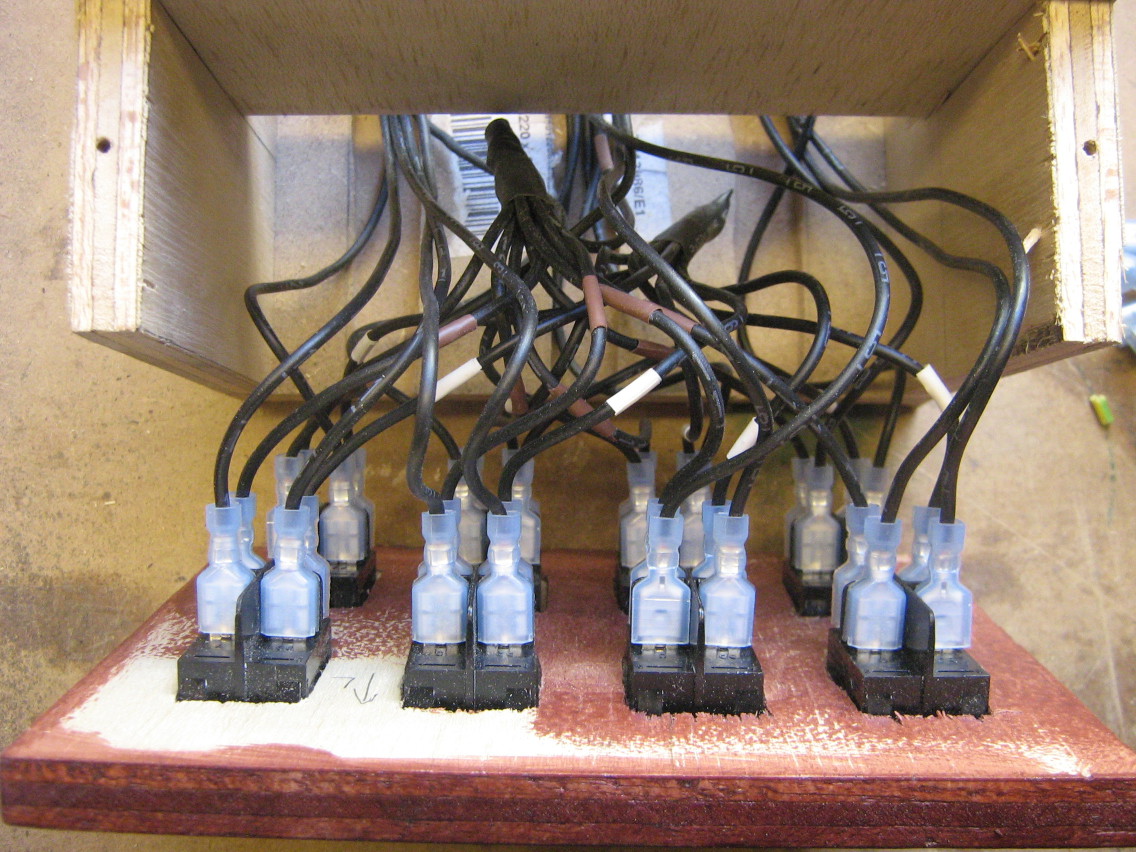
To connect the incoming power lines to each of the switches, I had a bit of a challenge. The switches have blade connectors, onto which blade receptacle connectors can be attached. These blade receptacles are "crimped" onto a cable. I tried to find some component that I could use to connect all a dozen of blade receptacles onto, but I couldn't find any of those. There are special blade connectors that allow daisy chaining each switch onto the next, but I didn't like the idea that the last switch would be connected through two dozen of crimp connections (and I did not have those daisy chaining connectors when I was working on this).
I also could not use a Twist-on wire connector, since that only works with solid cable (and the crimped blade connectors need stranded cable).
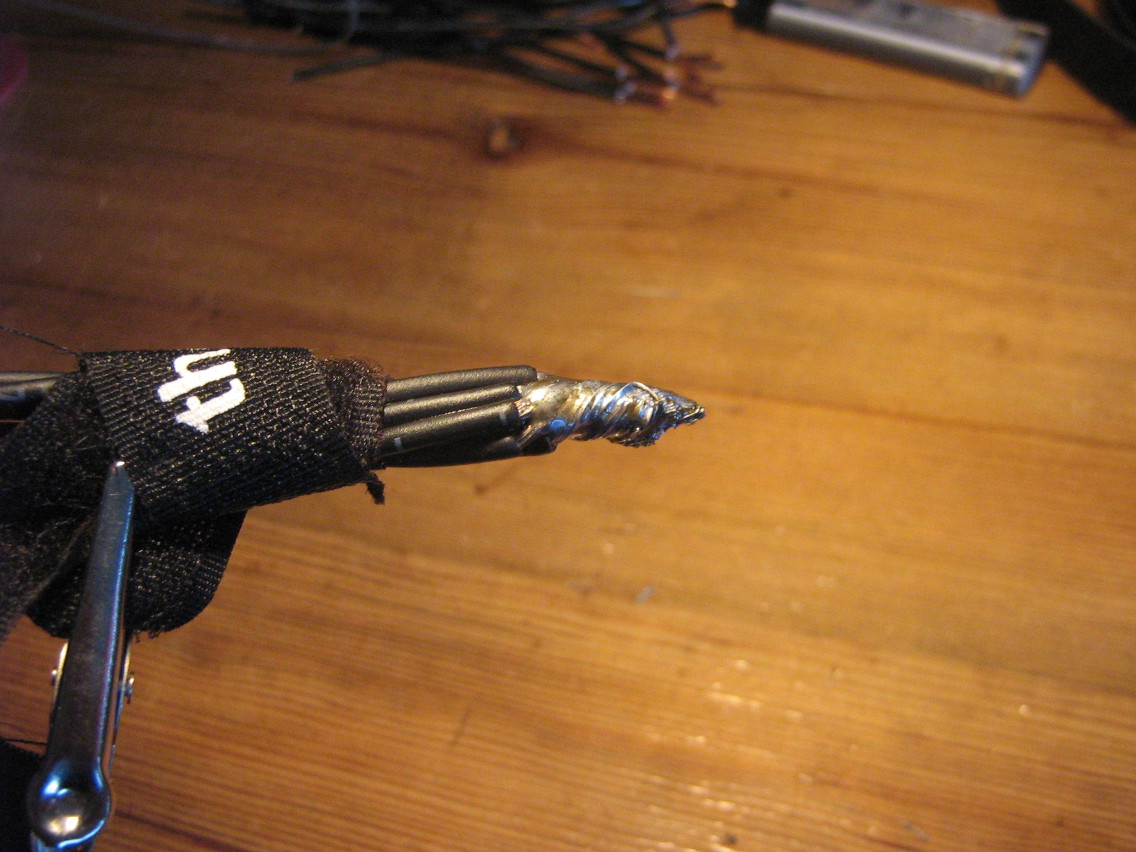
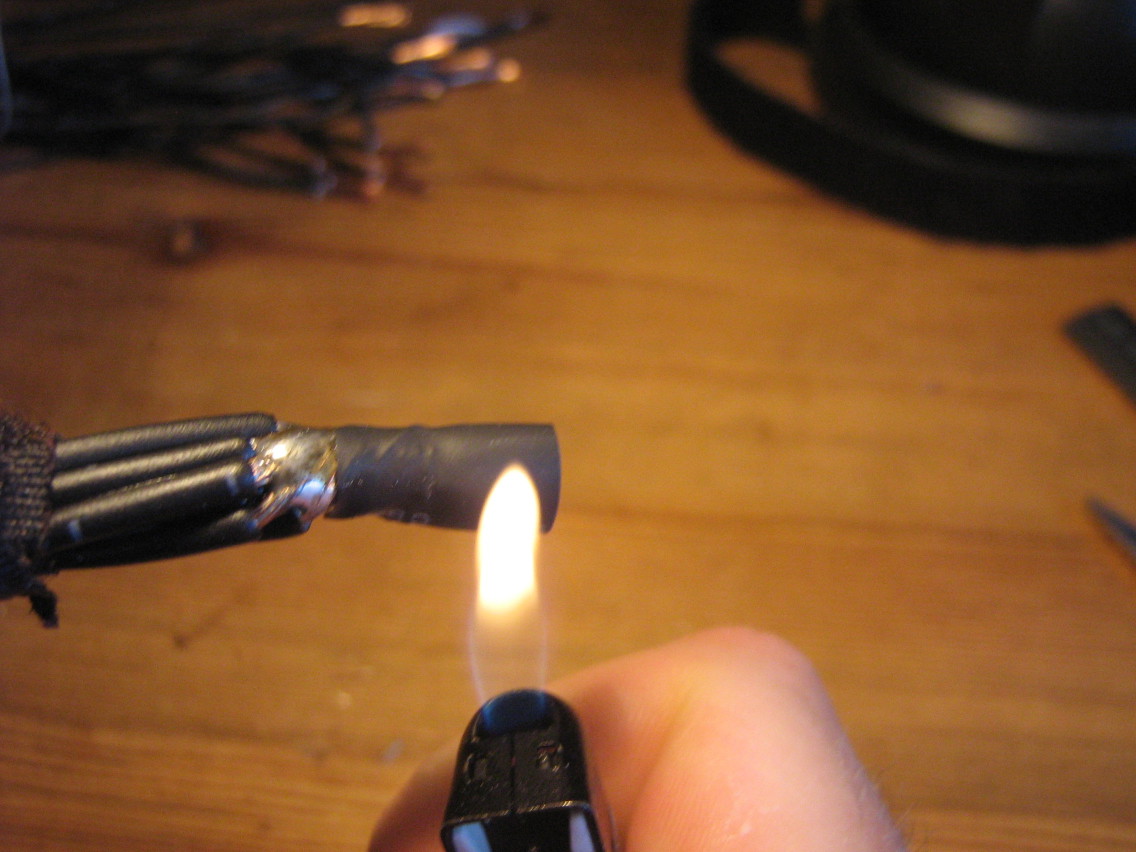
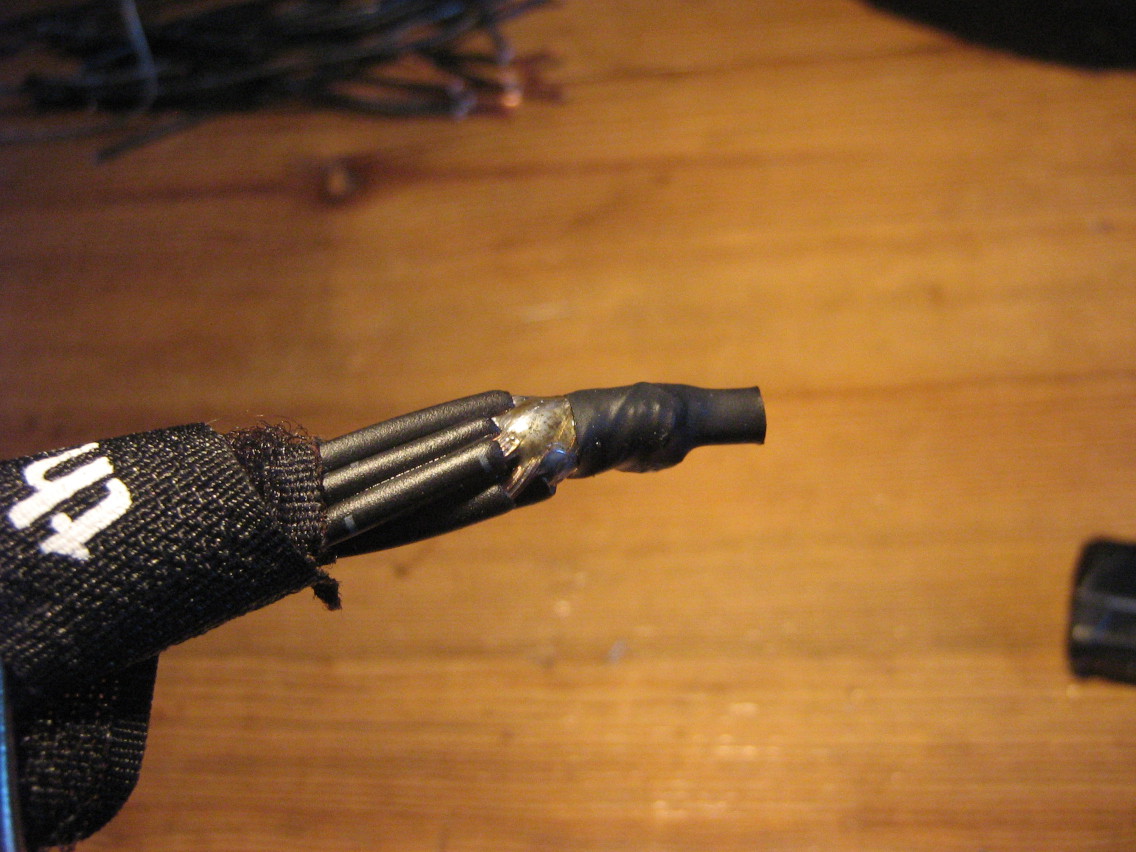
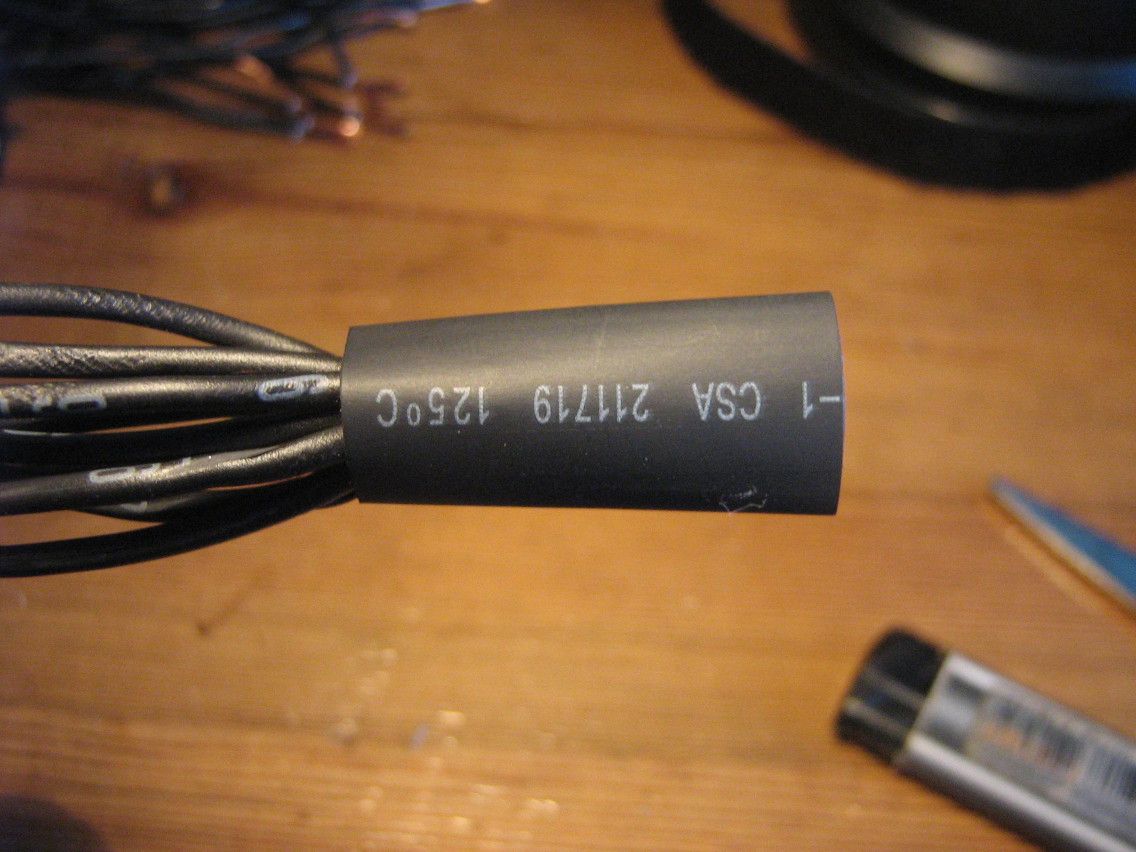
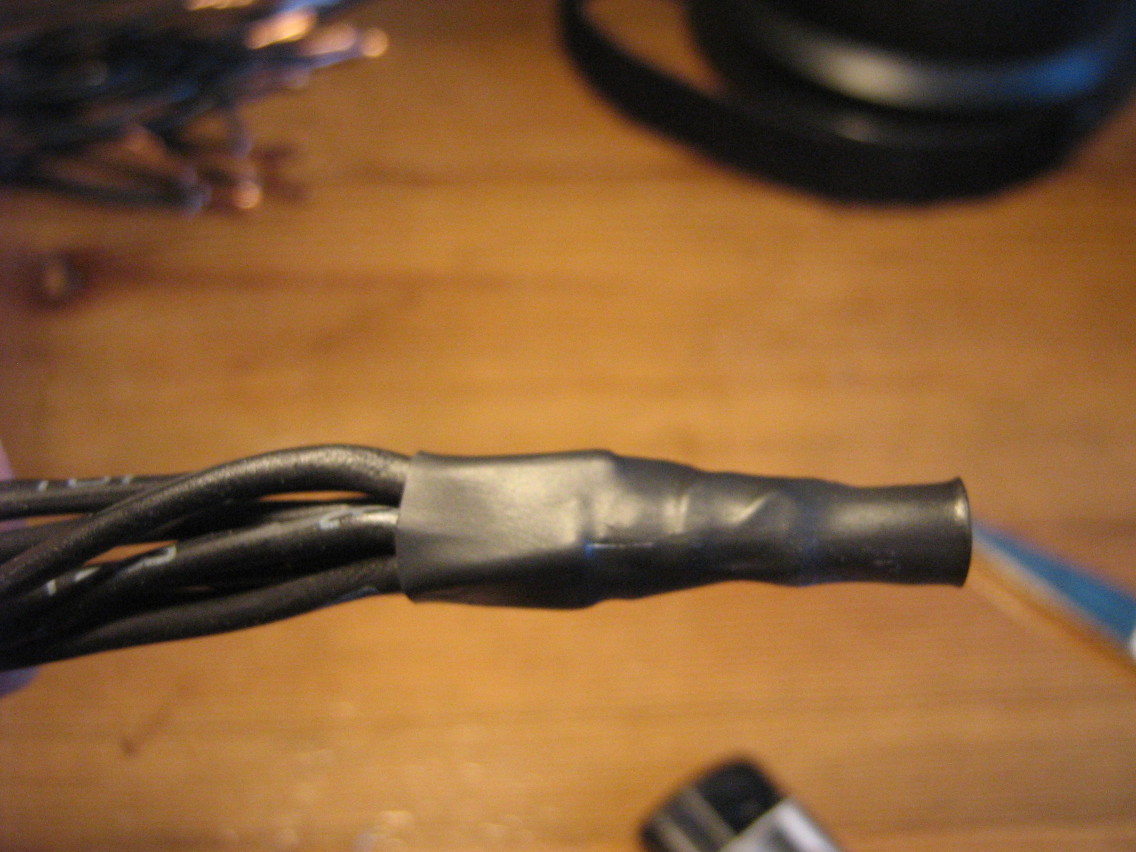
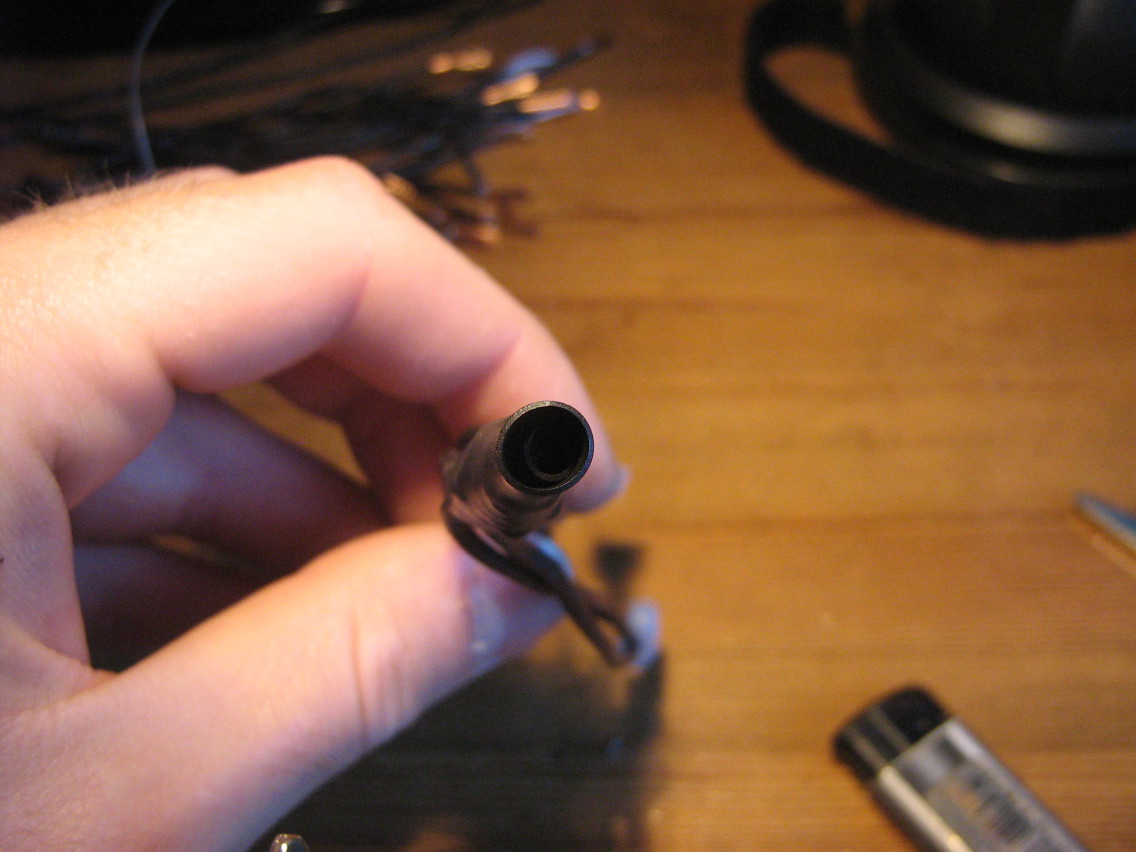
In the end, I just settled for soldering all these cables together. It's not very elegant, but I'm confident that this soldering connection should be capable of easily handling 16A of current, which is the most important in the end. I used two layers of heat-shrink tubing to insulate the big lump of soldering tin.
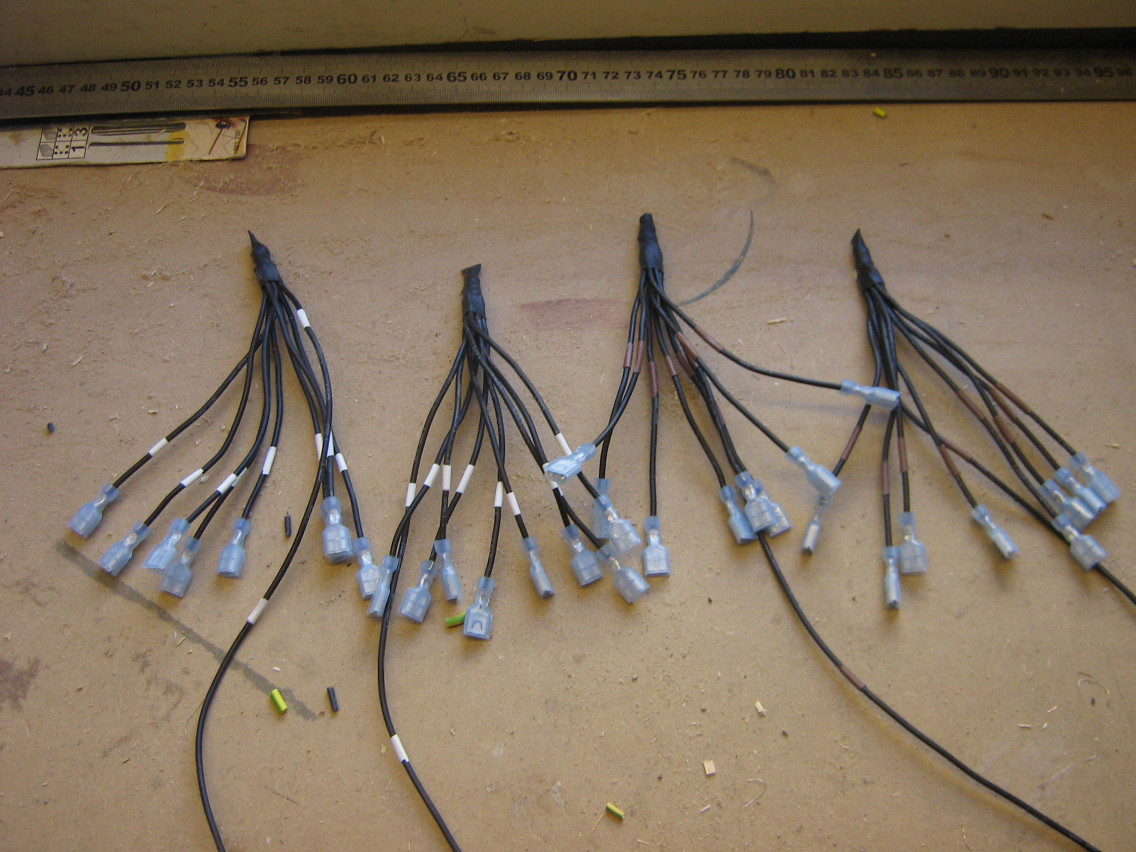
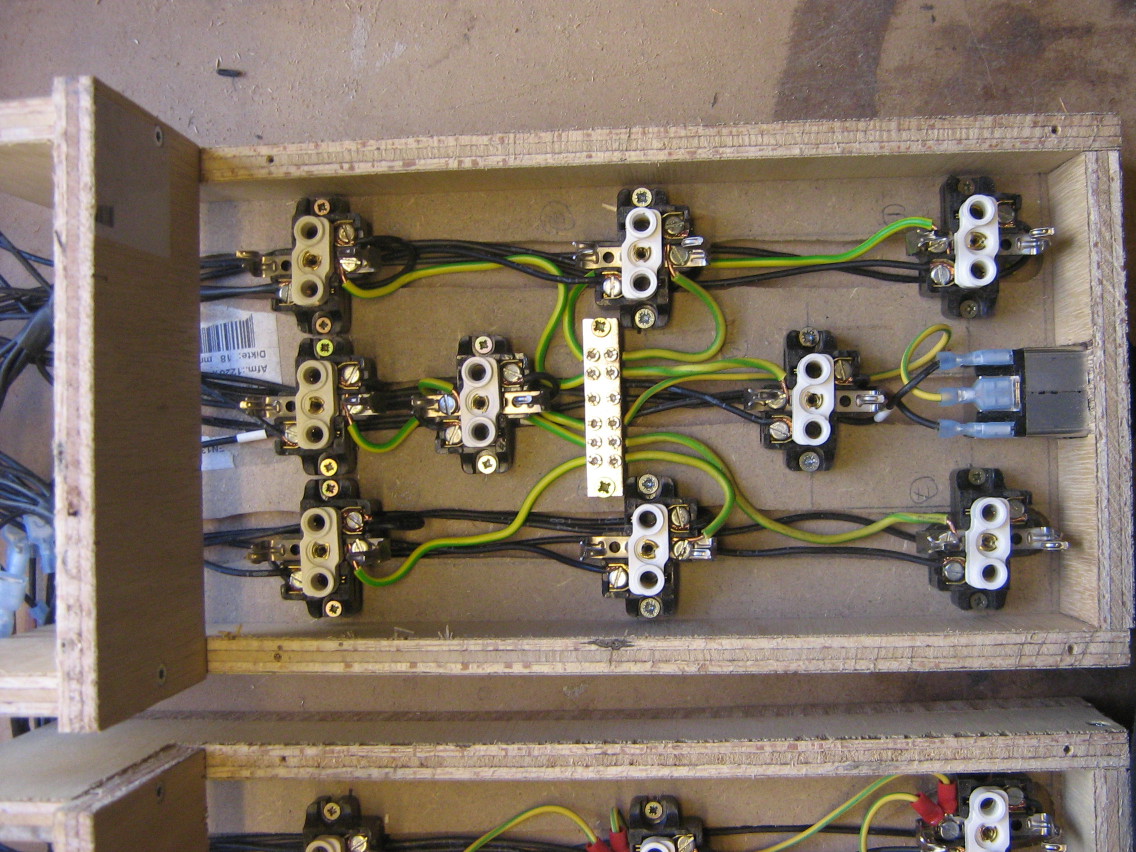
The last picture shows the end result: four cable octopusses that connect with one wire to the power entry point, and with eight wires to each of the switches. There's four of these in total, for both the line (with the brown marking tape) and neutral (with the white marking tape) connections in both of the boxes.
Connecting the outlets
The line and neutral connections of each outlet need to be connected to a single switch. I first connected wires to all of the outlets, with a blade connector crimped onto the other side. I used wires cut from the multicable I bought, which are conveniently numbered. Since the line and neutral connections are interchangeable in the European outlet system ("Schuko"), I didn't need to add labels to distinguish both cables coming from the same outlet.
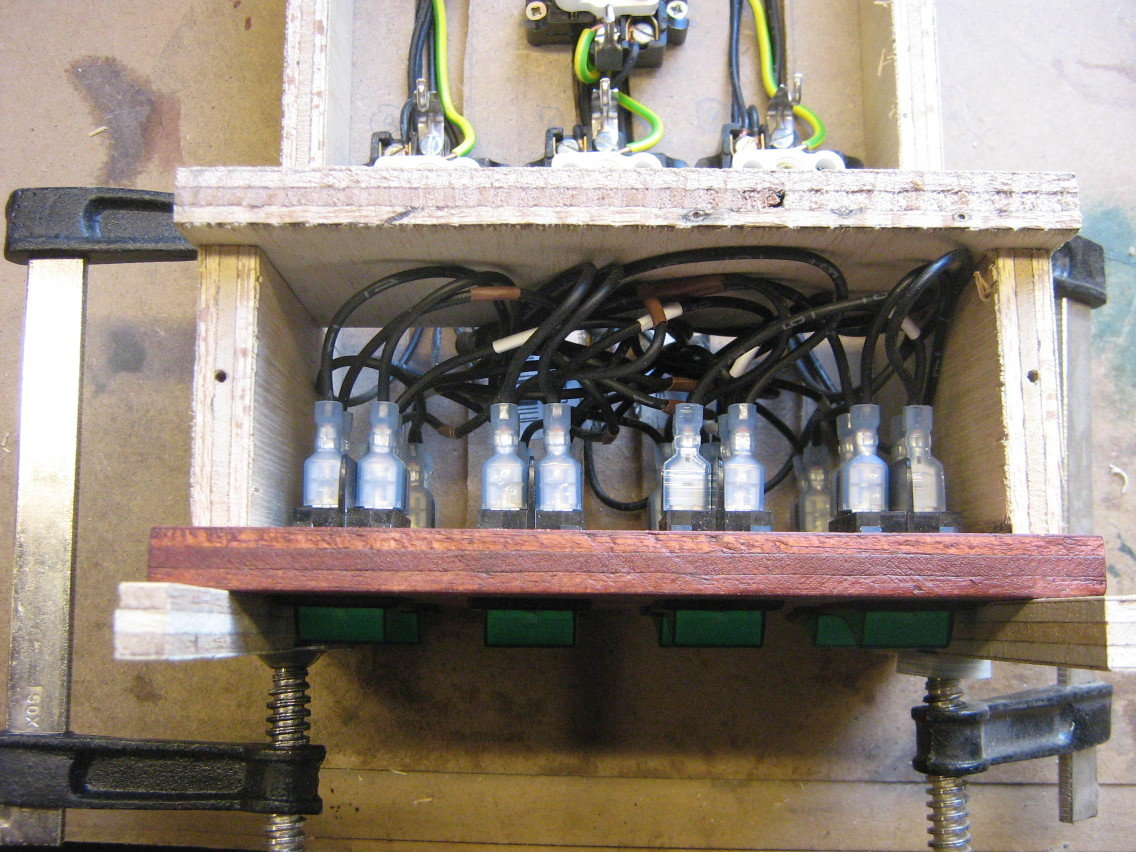
The earth terminals do not need to pass the switch, these need to be always connected. In the bigger box, I used an earthing terminal block (which is intended to be used in a breaker box) to connect the outlets in a "star" topology. For the smaller box, I couldn't find a smaller earthing terminal block, so I just daisy chained the outlets together. Since there's only a few outlets and there should never be much current through the earth terminals, this shouldn't be a problem here.
I also connected the multicable connector in the same way, but those wires are already covered by a MDF plate in the pictures.
The end result is 32 cables sticking out from each box, four cables for each switch.
Connecting the switches
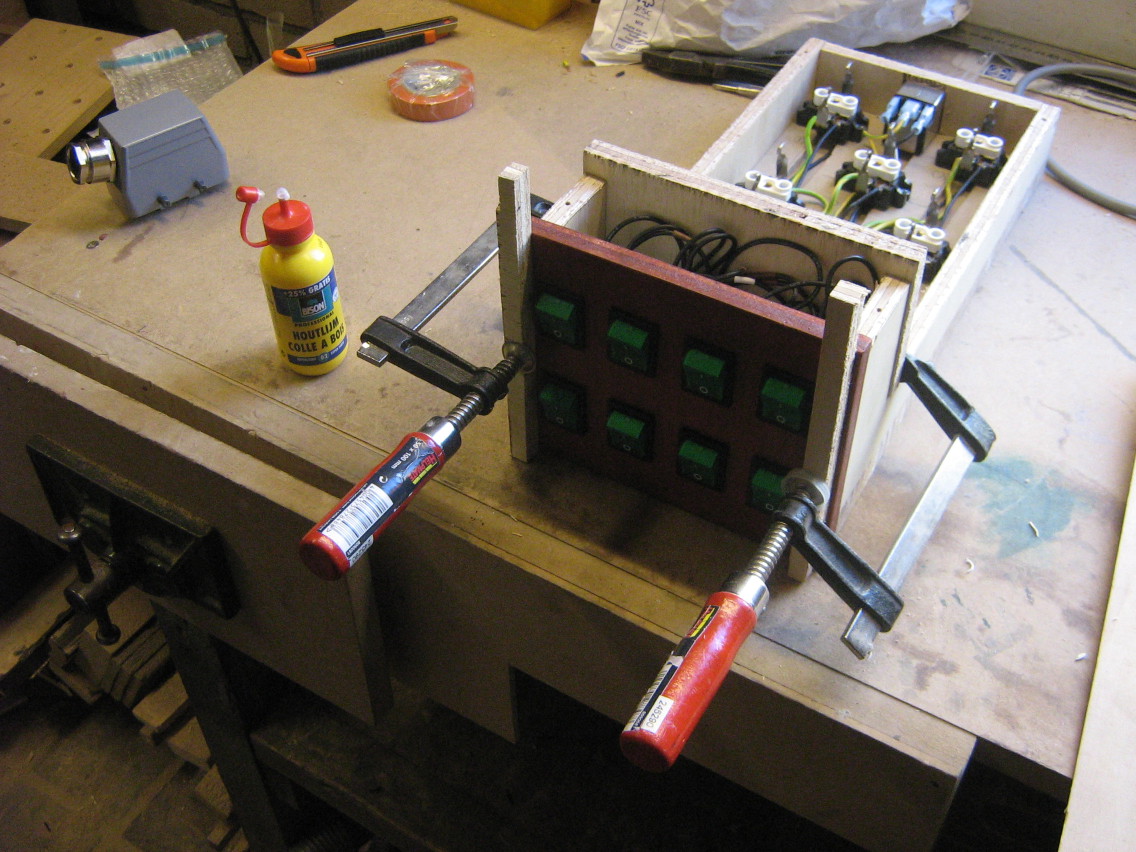
Connecting the switches was a matter of connecting all the 32 wires I prepared to the switches in the panel. After connecting the switches, I glued the front panel onto the box (so there would not be any visible screws on the front panel).
Assembled boxes
Now the boxes are assembled and ready for use, time to build the external outlet bar.
Note that the outlets seem a bit randomly placed, but I've tried to leave as much room available for power adapters to stick out in different directions, without blocking other outlets.
External outlets
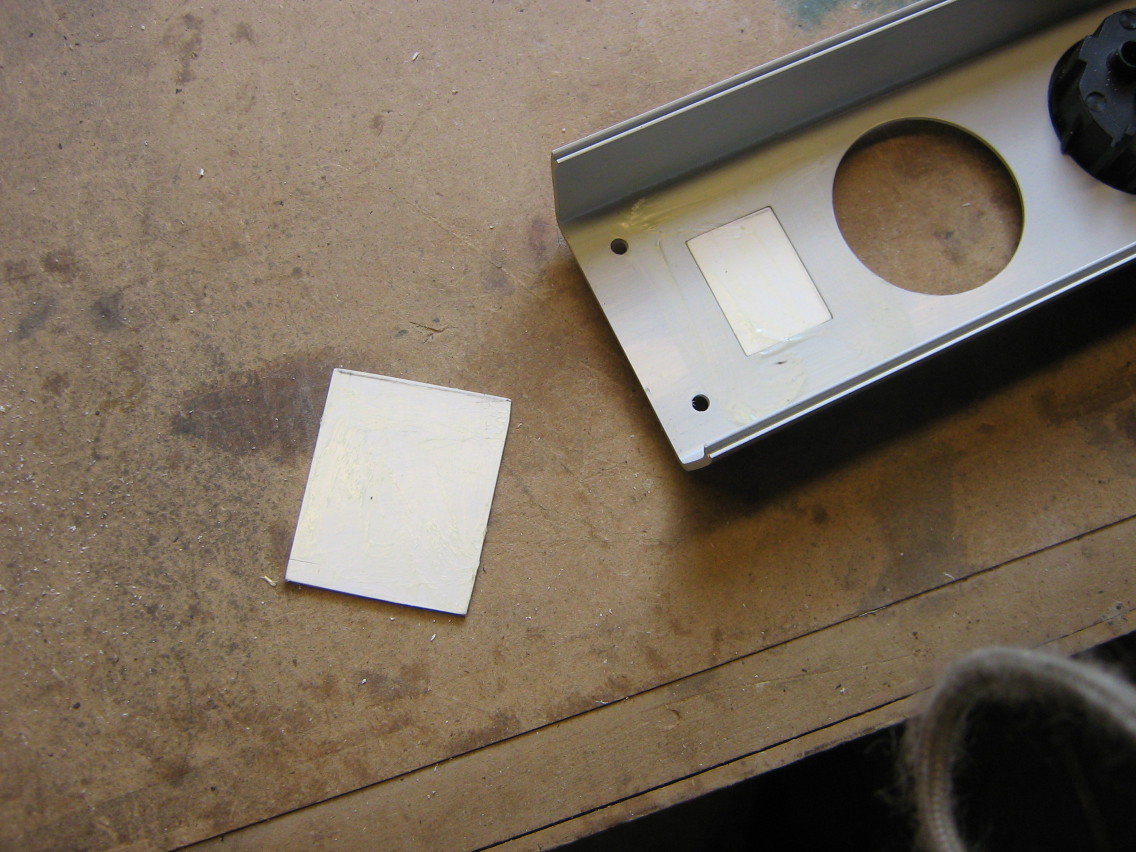
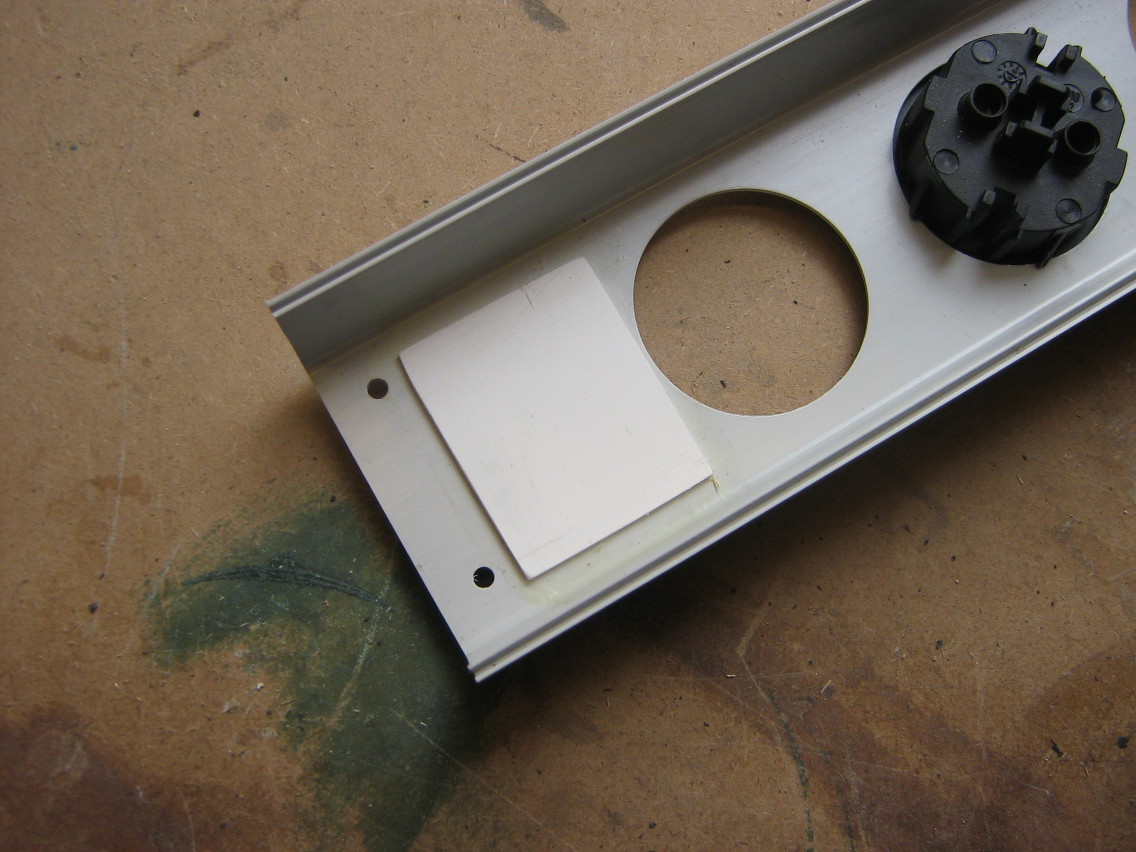
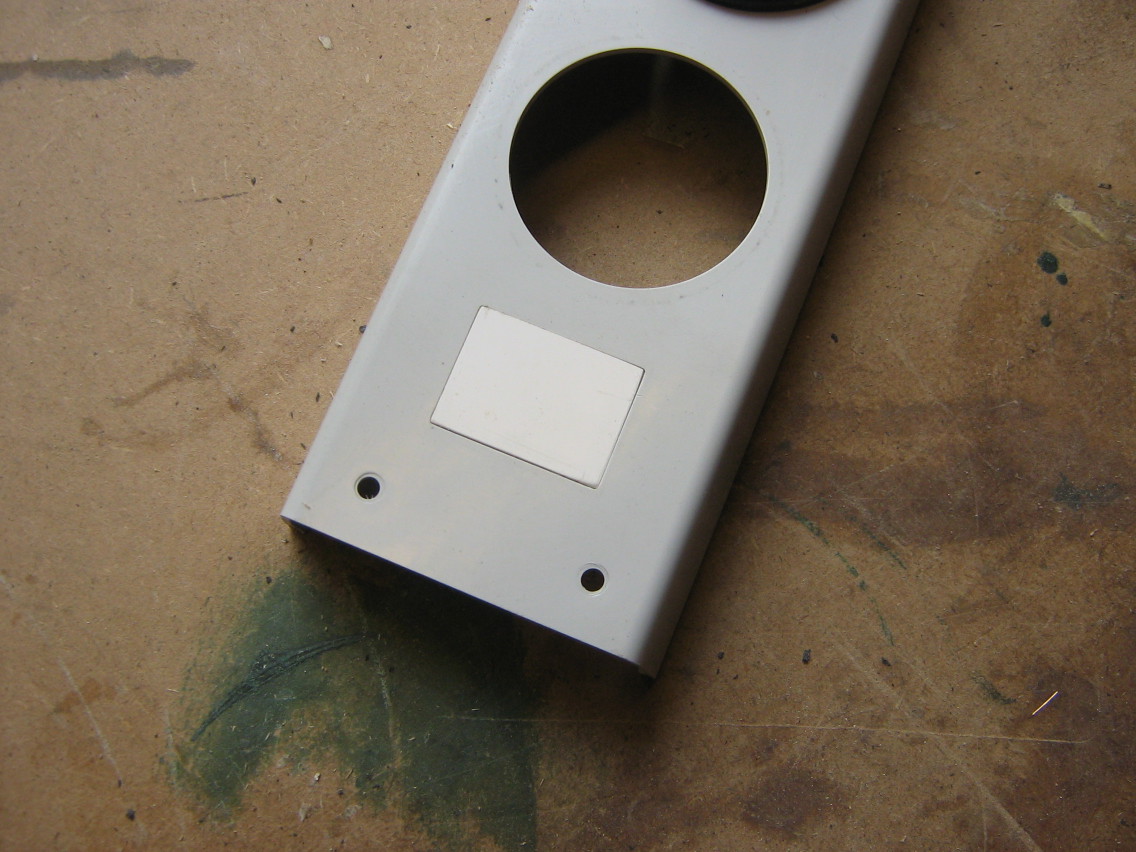
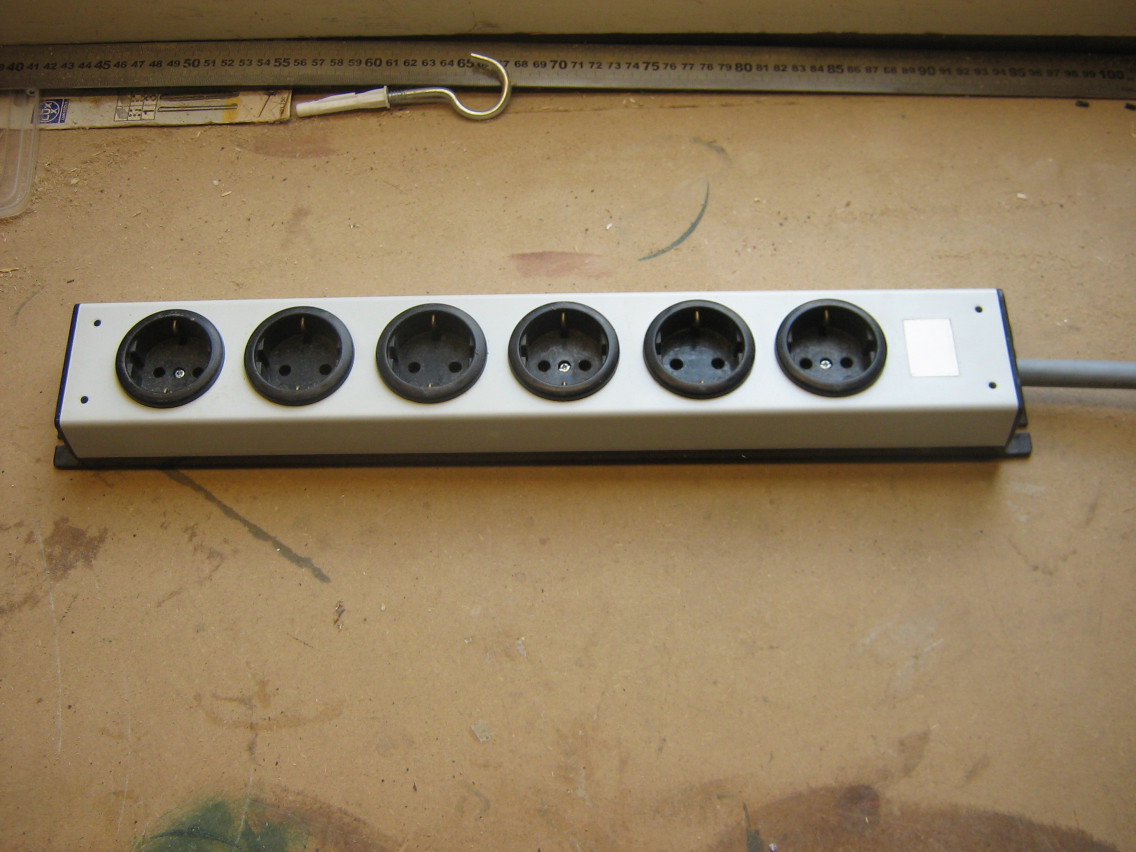
For the external outlets, I got an old powerbar (again at van Altena), which has each outlet individually connected internally. I connected the big multicable to all of the outlets on side and to the big connector on the other side of the cable
The old powerbar also had a single powerswitch to control all of the outlets. Since I couldn't find any use for this switch, I just removed it. To cover up the hole that it left, I used two rectangles cut out of an old plastic cable conduit. The smaller rectangle exactly fits in the hole, the larger rectangle just serves to glue the smaller one in place. The result is a cleanly covered switch hole.

Fixing the front panels
After installing the boxes into the cabinet, it turned out the front panels weren't glued on properly, the left one came off. Since I was already doubting if they would hold, I settled for a less elegant, but more secure solution: I just added some screws in an angle from the back, making them just long enough to not stick out at the front.
Finished
So, here's the finished thing. I really like the contrast between the green buttons and the red mahogany finish I used, it gives the thing a very classic look.
To be able to plug in devices, I can pull out the boxes towards the front. This is not very quick to do, but since I do not need to switch devices very often, that works out just fine.
I also added labels to the various switches, so I won't have to remember where I plugged in every device.

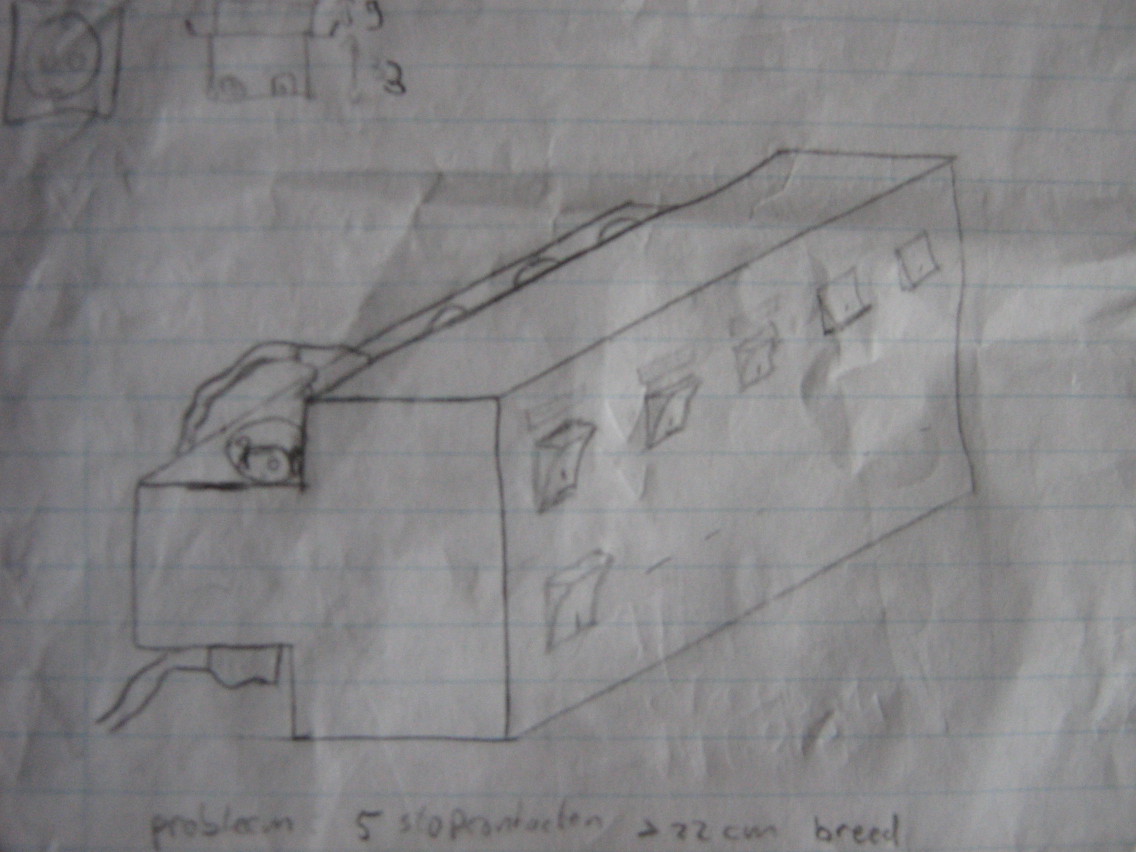
Design drawings
And just for historical reference, here are the design drawings I created during the process. If they look fuzzy to you, that's probably because I erased every part of the drawings probably at least once...

A I previously mentioned, Gnome3 is migrating away from the gconf settings storage to the to GSettings settings API (along with the default dconf settings storage backend).
So where you previously used the gconf-editor program to browse and
edit Gnome settings, you can now use dconf-editor to browse and
edit settings.
I do wonder if the name actually implies that dconf-editor is editing
the dconf storage directly, instead of using the fancy new GSettings
API? :-S

Since 2010, I've been working as a Freelancer (ZZP'er). Of course I registered a domain name right away, but until now, I didn't get around to actually putting a website on there (just as single page with boring markup and some contact information).
Last week, I created an actual website. It's still not spectacular, but at least it has some actual content and a few pages etc. So, with a modest amount of pride, I present: the website of Matthijs Kooijman IT.
For anyone wondering: I didn't put up some bloated CMS, running on a database, but I store my content in a handful of text files (using Markdown markup) and using poole to translate those to (static) HTML files. I keep the files in git and set up a git post-update hook to generate the HTML to make things extra convenient.

To be able to debug a bug in OpenTTD that only occured on SPARC machines, I needed an old SPARC machine so I could reproduce and hopefully fix the bug. After some inquiring at our local hackerspace, Bitlair (which had a few SPARC32 machines lying around, but I needed SPARC64), I got in touch with The_Niz from NURDSpace, the hackerspace in Wageningen. Surprisingly, it turned out I actually knew The_Niz already through work :-)
In any case, The_Niz was kind enough to lend me a SPARC Ultra1 workstation and Sun keyboard, and r3boot gave me a Sun monitor I could use (of course Sun hardware doesn't use a regular VGA connector...).
There was one caveat, though: The NVRAM battery in the Ultra1 was dead. The NVRAM chip stores the boot settings (like the BIOS settings in a regular PC), but also the serial number and MAC address of the machine (called the IDPROM info). Without those settings, you'll have to manually select the boot device on every boot (by typing commands at a prompt) and netbooting does not work, for lack of a MAC address (I presume regular networking, e.g., from within Linux, does not work either, but I haven't tested that yet).
Sun has taken an interesting approach to their NVRAM chip. Where most machines just use a piece of EEPROM (Flash) memory, which does not need power to remember its contents, Sun has used a piece of RAM memory (which needs power to remember its contents) combined with a small rechargeable battery.
This means that when the machine is not used for a
long time or is very old, the battery will eventually die, causing the
machine to spit out messages like "The IDPROM contents are
invalid and "Internal loopback test -- Did not receive expected
loopback packet".
I needed to install Debian on this Ultra1, so I needed some way to boot the installer. Since netbooting did not work, my first attempt was to ignore the NVRAM problem and just get the machine to boot off a Debian boot cd. This did not quite work out: the cdrom player in the Ultra1 (a 4x burner connected through SCSI) didn't like any of the CD-Rs and CD-RWs I threw at it. It spat out errors like "Illegal Instruction", "Program Terminated" or "SProgram Terminated" (where the first "S" is the start of "SILO", the SPARC bootloader).
As we all remember from a long time ago, the early generation CD-ROM players were quite picky with burnt CDs, so also this one. I found some advice online to burn my CDs at a lower speed (apparently the drive was rumoured to break on discs burned at 4x or higher), but my drive or CD-Rs didn't support writing slower than 8x... I could write my CD-RW at 4x and at one occasion I managed to boot the installer from a CD-RW and succesfully (but very, very slowly) scan the CD-RW contents, but then it broke with read errors when trying to actually load files from the CD-RW.
So, having no usable CD-ROM drive to boot from, I really had to get netboot going. Apparently it is possible (and even easy and not so expensive) to replace the NVRAM chip, but I didn't feel like waiting for one to be shipped. There is a FAQ available online with extensive documentation about the NVRAM chip and instructions on how to reprogram the IDPROM part with valid contents.
So, I reckoned that the battery was only needed when the machine was powered down, so I should be able to reprogram the IDPROM info and then just not poweroff the system, right?
Turns out that works perfectly. I reprogrammed the IDPROM using the MAC
address I read off the sticker on the NVRAM chip and made up a dummy
serial number. For some reason, the mkpl command did not work, I had
to use the more verbose mkp command. Afterwards, I gave the reset
command and the "Internal loopback test" error was gone and the machine
started netbooting, using RARP and TFTP.
By now, I've managed to install Debian, get Xorg working and reproduce the bug in OpenTTD, so time for fixing it :-D
For some time, I've been looking for a decent backup solution. Such a solution should:
- be completely unattended,
- do off-site backups (and possibly onsite as well)
- be affordable (say, €5 per month max)
- run on Linux (both desktops and headless servers)
- offer plenty of space (couple of hundred gigabytes)
Up until now I haven't found anything that met my demands. Most backup solutions don't run on (headless Linux) and most generic cloud storage providers are way too expensive (because they offer high-availability, high-performance storage, which I don't really need).
Backblaze seemed interesting when they launched a few years ago. They just took enormous piles of COTS hard disks and crammed a couple dozen of them in a custom designed case, to get a lot of cheap storage. They offered an unlimited backup plan, for only a few euros per month. Ideal, but it only works with their own backup client (no normal FTP/DAV/whatever supported), which (still) does not run on Linux.
Crashplan

Recently, I had another look around and found CrashPlan, which offers an unlimited backup plan for only $5 per month (note that they advertise with $3 per month, but that is only when you pay in advance for four years of subscription, which is a bit much. Given that if you cancel beforehand, you will still get a refund of any remaining months, paying up front might still be a good idea, though). They also offer a family pack, which allows you to run CrashPlan on up to 10 computers for just over twice the price of a single license. I'll probably get one of these, to backup my laptop, Brenda's laptop and my colocated server.
The best part is that the CrashPlan software runs on Linux, and even on a headless Linux server (which is not officially supported, but CrashPlan does document the setup needed). The headless setup is possible because CrashPlan runs a daemon (as root) that takes care of all the actual work, while the GUI connects to the daemon through a TCP port. I still need to double-check what this means for the security though (especially on a multi-user system, I don't want to every user with localhost TCP access to be able to administer my backups), but it seems that CrashPlan can be configured to require the account password when the GUI connects to the daemon.
The CrashPlan software itself is free and allows you to do local backups and backups to other computers running CrashPlan (either running under your own account, or computers of friends running on separate accounts). Another cool feature is that it keeps multiple snapshots of each file in the backup, so you can even get back a previous version of a file you messed up. This part is entirely configurable, but by default it keeps up to one snapshot every 15 minutes for recent changes, and reduces that to one snapshot for every month for snapshots over a year old.
When you pay for a subscription, the software transforms into CrashPlan+ (no reinstall required) and you get extra features such as multiple backup sets, automatic software upgrades and most notably, access to the CrashPlan Central cloud storage.
I've been running the CrashPlan software for a few days now (it comes with a 30-day free trial of the unlimited subscription) and so far, I'm quite content with it. It's been backing up my homedir to a local USB disk and into the cloud automatically, I don't need to check up on it every time.
The CrashPlan runs on Java, which I doesn't usually make me particularly enthousiastic. However, the software seems to run fast and reliable so far, so I'm not complaining. Regarding the software itself, it does seem to me that it's not intended for micromanaging. For example, when my external USB disk is not mounted, the interface shows "Destination unavailable". When I then power on and mount the external disk, it takes some time for Crashplan to find out about this and in the meanwhile, there's no button in the interface to convince CrashPlan to recheck the disk. Also, I can add a list of filenames/path patterns to ignore, but there's not really any way to test these regexes.
Having said that, the software seems to do its job nicely if you just let it do its job in the background. On piece of micromanagement which I do like is that you can manually pause and resume the backups. If you pause the backups, they'll be automatically resumed after 24 hours, which is useful if the backups are somehow bothering you, without the risk that you forget to turn the backups back on.
Backing up only when docked
Of course, sending away backups is nice when I am at home and have 50Mbit fiber available, but when I'm on the road, running on some wifi or even 3G connection, I really don't want to load my connection with the sending of backup data.
Of course I can manually pause the backups, but I don't want to be doing that every time when I pick up my laptop and get moving. Since I'm using a docking station, it makes sense to simply pause backups whenever I undock and resume them when I dock again.
The obvious way to implement this would be to simply stop the CrashPlan daemon when undocking, but when I do that, the CrashPlanDesktop GUI becomes unresponsive (and does not recover when the daemon is started again).
So, I had a look at the "admin console", which offers "command
line" commands, such as pause and resume. However, this command line
seems to be available only inside the GUI, which is a bit hard to
script (also note that not all of the commands seem to work for me,
sleep and help seem to be unknown commands, which cause the console
to close without an error message, just like when I just type something
random).
It seems that these console commands are really just sent verbatim to the CrashPlan daemon. Googling around a bit more, I found a small script for CrashPlan PRO (the business version of their software), which allows sending commands to the daemon through a shell script. I made some modifications to this script to make it useful for me:
- don't depend on the current working dir, hardcode
/usr/local/crashplanin the script instead - fixed a bashism (
==vs=) - removed
-XstartOnFirstThreadargument from java (MacOS only?) - don't store the commands to send in a separate
$commandbut instead pass "$@" to java directly. This latter prevents bash from splitting arguments with spaces in them into multiple arguments, which causes the command "pause 9999" to be interpreted as two commands instead of one with an argument.
I have this script under /usr/local/bin/CrashPlanCommand:
#!/bin/sh
BASE_DIR=/usr/local/crashplan

if [ "x$@" == "x" ] ; then
  echo "Usage: $0 <command> [<command>...]"
  exit
fi

hostPort=localhost:4243
echo "Connecting to $hostPort"

echo "Executing $@"

CP=.
for f in `ls $BASE_DIR/lib/*.jar`; do
    CP=${CP}:$f
done

java -classpath $CP com.backup42.service.ui.client.ConsoleApp $hostPort "$@"
Now I can run CrashPlanCommand 'pause 9999' and CrashPlanCommand
resume to pause and resume the backups (9999 is the number of minutes
to pause, which is about a week, since I might be undocked more than 24
hourse, which is the default pause time).
To make this run automatically on undock, I created a simply udev rules
file as /etc/udev/rules.d/10-local-crashplan-dock.rules:
ACTION=="change", ATTR{docked}=="0", ATTR{type}=="dock_station", RUN+="/usr/local/bin/CrashPlanCommand 'pause 9999'"
ACTION=="change", ATTR{docked}=="1", ATTR{type}=="dock_station", RUN+="/usr/local/bin/CrashPlanCommand resume"
And voilà! Automatica pausing and resuming on undocking/docking of my laptop!
Last weekend, I've been at the winter Efteling. The Efteling opens up for a few weekends during the cold season, with an icy theme. Last weekend was the first. Brenda had been buying a lot of Madras Chicken from Knorr, which bought us six tickets at a discount. We offered two to Dennis and Alice and gave the other two to Suus and Gijs for their respective birthdays.
 We also knew about a few other friends (LARPers) who would go in the same
weekend, but a whole throng of LARPers turned up last Saturday (about 25 to 30
I think). Apart from that, it wasn't too busy at the park, so there were
hardly any lines during the day. I have a nice souvenir picture from the Pandadroom
(Panda dream) attraction (since everyone knows the Pandadroom isn't so much
fun because the fancy 3D animation, but because of the playground with video
games that comes after!).
We also knew about a few other friends (LARPers) who would go in the same
weekend, but a whole throng of LARPers turned up last Saturday (about 25 to 30
I think). Apart from that, it wasn't too busy at the park, so there were
hardly any lines during the day. I have a nice souvenir picture from the Pandadroom
(Panda dream) attraction (since everyone knows the Pandadroom isn't so much
fun because the fancy 3D animation, but because of the playground with video
games that comes after!).
Since we did about every attraction in the park, my brains were upside down in my skull and I was pretty exhausted when we finally got on the train home. Yet, I was not headed home, since my aunt held her birthday in Eindhoven, which is pretty close to the Efteling. I joined in on the party and was not in bed before 0530.
I went home the next day after breakfast (halfway the afternoon), back to Brenda. As you might imagine, the exhaustion had hardly lessened, so I decided not to get up together with Brenda Monday morning at 0650. Good thing, since I managed to sleep until 1300 for a whopping 13,5 hours of sleep. Didn't know I was that tired...

Last weekend, I've travelled to Mattstedt, a small village near the center of Germany, to attend a folk festival there. The Gonnagles, a Dutch folk band, were performing at the festival and asked me to help out as an audio technician (since not all of the Gonnagles could attend). Liking the opportunity to do some more sound engineering, do some dancing and hang out with the Gonnagles, I agreed to come along.

After I said yes, I realized that the Festival was quite far into Germany (5 hours from Enschede, though on the way there, we got caught in a traffic jam making it 7,5 hours, plus 1,5 hours from Amersfoort to Enschede). Still, I shared the car with nice people (Erik and Moes on the way there, just Erik on the way back) and the festival was nice, so in the end it was worth every minute of driving time. Moes, Erik and I also travelled on friday instead of saturday, leaving an extra fridaynight for dancing and saturday afternoon for relaxing.
During the festival, I ended up helping out with the audio engineering of the rest of the festival, instead of just the Gonnagles' performance. There were two audio technicians there, but neither of them were very experienced in setting up a live performance and getting to the bottom of any problems that (always) show up. Also, the rented equipmented wasn't quite top-notch quality, which didn't really help either.
Fortunately, I was able to help out a bit and debug some problems with the PA system and monitor speakers. On saturday, I also did most of the mixing for Cassis, one of the other bands. Apparently people thought I did a good job, since I got a lot of thanks from people who apparently thought I single-handedly saved the festival from horrible sound quality (which would be underappreciating the other technicians, which also worked hard to get everything running).
The festival itself was nice as well. I always enjoy the performance of Parasol, who are very talented, but I also enjoyed the other bands. The weather was good, so I had some nice relaxed moments lying in the sun, I listened to good music, shared some nice dances with a pretty German girl, and just had fun.
So, again next year?


For the occasion of my fourtieth blood donation at the Sanquin blood bank, I got a nice pluche pelikan (which is their mascotte / logo). It got a nice spot on top of one of the speakers on my desk, where it has a nice view of my room.
Are you a blood donor yet? More donors are still needed in the Netherlands, so sign up now!
As of today, I am officially a blood donor. I've been at Sanquin, the national blood donation organization, this morning to deliver half a liter of blood. I have been there once before, to let them take a small amount of blood for blood tests. Apparently they found nothing obviously wrong with, so I was invited again. Depending on the need, I will be invited a few times each year to give more blood.
Blood donation is something that has been on my "todo" list for quite some while now, so I decided to simply stop delaying and do it a while back. I think that everybody should think of being a blood donor. A lot of of our health care is dependent on donor blood. Since people expect health care whenever they need it, can't we expect people to give blood whenever needed?
What scared me a little, was that Sanquin Enschede is still short of a lot of donors. They are aiming to have another 1450 donors, while they currently have about 5000. Considering that Enschede has over 150.000 inhabitants, that amounts to just over three percent. Surely there are more people prepared to invest some time in this?
So, are you not a blood donor yet? Sign up now! It will only cost you some time every now and then, the people are very nice and there's free drinks and cookies involved :-)
Edit: This used to say Enschede had only 200 donors, but that turned out to be 200 hundred new donors in their current campaign for new donors. In total, Enschede has around 5000 registered donors.