These are the ramblings of Matthijs Kooijman, concerning the software he hacks on, hobbies he has and occasionally his personal life.
Most content on this site is licensed under the WTFPL, version 2 (details).
Questions? Praise? Blame? Feel free to contact me.
My old blog (pre-2006) is also still available.
See also my Mastodon page.
| Sun | Mon | Tue | Wed | Thu | Fri | Sat |
|---|---|---|---|---|---|---|
| 1 | 2 | 3 | ||||
| 4 | 5 | 6 | 7 | 8 | 9 | 10 |
| 11 | 12 | 13 | 14 | 15 | 16 | 17 |
| 18 | 19 | 20 | 21 | 22 | 23 | 24 |
| 25 | 26 | 27 | 28 | 29 | 30 | 31 |
(...), Arduino, AVR, BaRef, Blosxom, Book, Busy, C++, Charity, Debian, Electronics, Examination, Firefox, Flash, Framework, FreeBSD, Gnome, Hardware, Inter-Actief, IRC, JTAG, LARP, Layout, Linux, Madness, Mail, Math, MS-1013, Mutt, Nerd, Notebook, Optimization, Personal, Plugins, Protocol, QEMU, Random, Rant, Repair, S270, Sailing, Samba, Sanquin, Script, Sleep, Software, SSH, Study, Supermicro, Symbols, Tika, Travel, Trivia, USB, Windows, Work, X201, Xanthe, XBee
 &
&
(With plugins: config, extensionless, hide, tagging, Markdown, macros, breadcrumbs, calendar, directorybrowse, entries_index, feedback, flavourdir, include, interpolate_fancy, listplugins, menu, moreentries, pagetype, preview, seemore, storynum, storytitle, writeback_recent)
Valid XHTML 1.0 Strict & CSS
XBee modules are a range of wireless modules built by Digi, and are typically used to add wireless connectivity to Arduino or other microcontroller based projects. To configure these modules and update their firmware, you can use the XCTU configuration utility. This utility uses a serial port to talk to the XBee module, so you will need some way to connect to the XBee module to a serial port on your computer (using a USB "TTL" serial port, a "real" RS232 port has too high voltage).
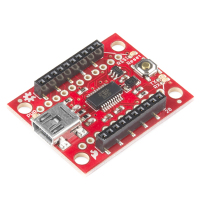
The easiest way is to use a dedicated board, like the SparkFun Explorer USB:
However, if you already have an Arduino and an XBee shield for it, you might want to use those to connect XCTU to your XBee module. In theory, this should be a matter of re-arranging some wires, but in practice I've run into some problems attempting this (depending on the hardware used).
In this post, I'll show a few ways to do this using an Arduino and a shield, and explain some of the problems you might run into.

